
800-366-7235
Since 1998

Mounting the ERA-UTX

This document does not discuss programming the ERA-UTX but rather the physical mounting of the transmitter. You do not need the smaller magnetic if using a push button only. Mounting the ERA-UTX as a Push Button You can use the transmitter as a doorbell that activates when the center button is pressed. Mounting the ERA-UTX as…

Updated: September 7, 2026Original publish date: December 14, 2022

This document does not discuss programming the ERA-UTX but rather the physical mounting of the transmitter. You do not need the smaller magnetic if using a push button only.

Mounting the ERA-UTX as a Push Button

You can use the transmitter as a doorbell that activates when the center button is pressed.

  • Use a drill bit and two of the two included screws to mount the transmitter bracket. Make sure the arrow printed on the bracket is pointed up.
  • If mounting outside, ensure the grey silicon grommets covering the screw holes are inserted.
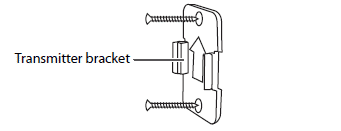
era-utx-screws-transmitter-bracket
  • Slide the transmitter down onto the bracket.
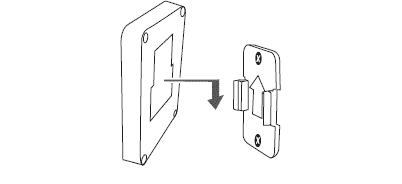
era-utx-slide-onto-bracket

Mounting the ERA-UTX as a Door/Window Contact

The ERA-UTX may also be used as a magnetic door/window contact that triggers when the smaller magnet separates from the larger piece.

  • Choose mounting locations where the magnetic contact (the smaller piece) is 1/2 inch or less from the push button (the large piece).
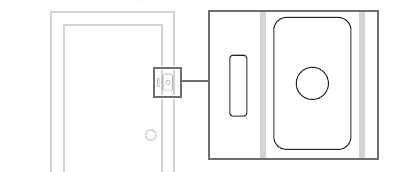
era-utx-door-window-mounting-1
  • Mount the magnetic contact with a drill and the two included screws, then snap the cover back on the magnet.
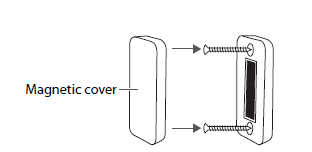
era-utx-door-window-mounting-magnetic-mount
  • Mount the transmitter bracket with the drill holes and two included screws. Make sure the arrow on the bracket is facing up.
era-utx-screws-transmitter-bracket
  • If you mount your transmitter outdoors, ensure the silicon grommets are plugged into the push button (the larger piece) to waterproof the casing.
  • Slide the transmitter down onto the bracket.
era-utx-slide-onto-bracket

More in ERA Product FAQ

Browse the full FAQ category or continue with related answers from the same FAQ category.

View category
My ERA-DSTX Detection Range Dropped From 25 Feet to 15Nine times out of ten nothing has failed. A PIR sensor’s usable range is a moving number set by battery voltage, thermal contrast against the background, and the angle at which the target crosses the beam pattern — none of which show up on a thermometer or a tape measure. Work the checks below in order. Most cases resolve at step 1 or step 3.How Far Will My ERA-DSTX Driveway Sensor Really Reach?A PIR sensor doesn’t measure distance — it measures contrast. It sees a target only when that target is meaningfully warmer or cooler than whatever sits directly behind it, and only when the target moves across the lens’s detection pattern rather than straight at it. Change the background temperature, the approach angle, the battery voltage, or the amount of film on the lens, and the same sensor in the same spot will “lose” ten feet of range with nothing visibly different.Understanding the 12V DC Outputs on Your ERA-DCRX Receiver: A Guide to Zones, Strobes, and BellsIntroduction to the ERA-DCRX Receiver The ERA-DCRX receiver is the heart of your long-range wireless doorbell system, designed for business and warehouse environments. It features four independent zones, each capable of supporting up to three sensors or transmitters (for a total of up to 12 per receiver). When a zone is triggered, the receiver plays…Extending ERA Product Range: Connecting ERA-UTX to ERA-DCRX C-FORM RelayThis guide explains how to connect the ERA-UTX to the C-FORM relay on the ERA-DCRX, effectively creating a relay or extender to increase the operating range of ERA products by an additional 4,000 ft. Detailed Use Case Example Consider a scenario where a customer has purchased an ERA-DCKIT, which includes: Initial setup: Solution: Introduce an…ERA-RXPG Plugin Receiver User ManualIntroduction The ERA-RXPG is a long-range, wireless door chime receiver that plugs into a standard 120V outlet. It is compatible with all ERA transmitters. Helpful Notes Volume Control: The volume button is located on the side of the unit (see Figure 1). Pushing it will scroll through four (4) levels of volume control. Pushing it…