
Using the C-Form Relay on the ERA-DCRX Receiver
How to Connect An External Device to the C-Form Relay on the ERA-DCRX Please note, in most cases, using the 12V DC outputs to connect an external device to the system is sufficient. For these instructions on this process, click here. Each ERA-DCRX receiver has 1 x C-form relay for integrating and connecting external devices. Unlike…
How to Connect An External Device to the C-Form Relay on the ERA-DCRX
*Please note, in most cases, using the 12V DC outputs to connect an external device to the system is sufficient. For these instructions on this process, click here.
Each ERA-DCRX receiver has 1 x C-form relay for integrating and connecting external devices. Unlike the 12V DC outputs (1 per zone) on the receiver, the C-Form relay DOES NOT supply power to the external device you are connecting to it.
Why Use the C-Form Relay?
The C-Form relay offers advantages and flexibility the 12V DC outputs do not provide. For example, with the 12VDC output, the device you are powering has to be rated for 12V or less. In addition, the external device you are connecting has to have a max current below 400mA. This is not the case with the C-Form relay, as it does not supply the power but functions more like a switch.
Another advantage of the relay is that it’s not limited to one zone. Dip switches on the ERA-DCRX allow you to associate the device on the C-Form relay with any combination of the four zones.
For example, you have to push buttons, one for zone one and another for zone two. You might want to put a different colored strobe light on each zone. Red is in Zone One, and blue is in Zone Two. Push button A triggers the zone 1 melody and the red strobe, and push button B triggers the zone 2 melody and the blue strobe. You like that the strobes provide a good visual notification, but you want something louder. Using the C-Form relay, you add a loud siren or fire bell to trigger when one (or both) of the push buttons are pressed.
How to Connect an External Device to the C-Form Relay
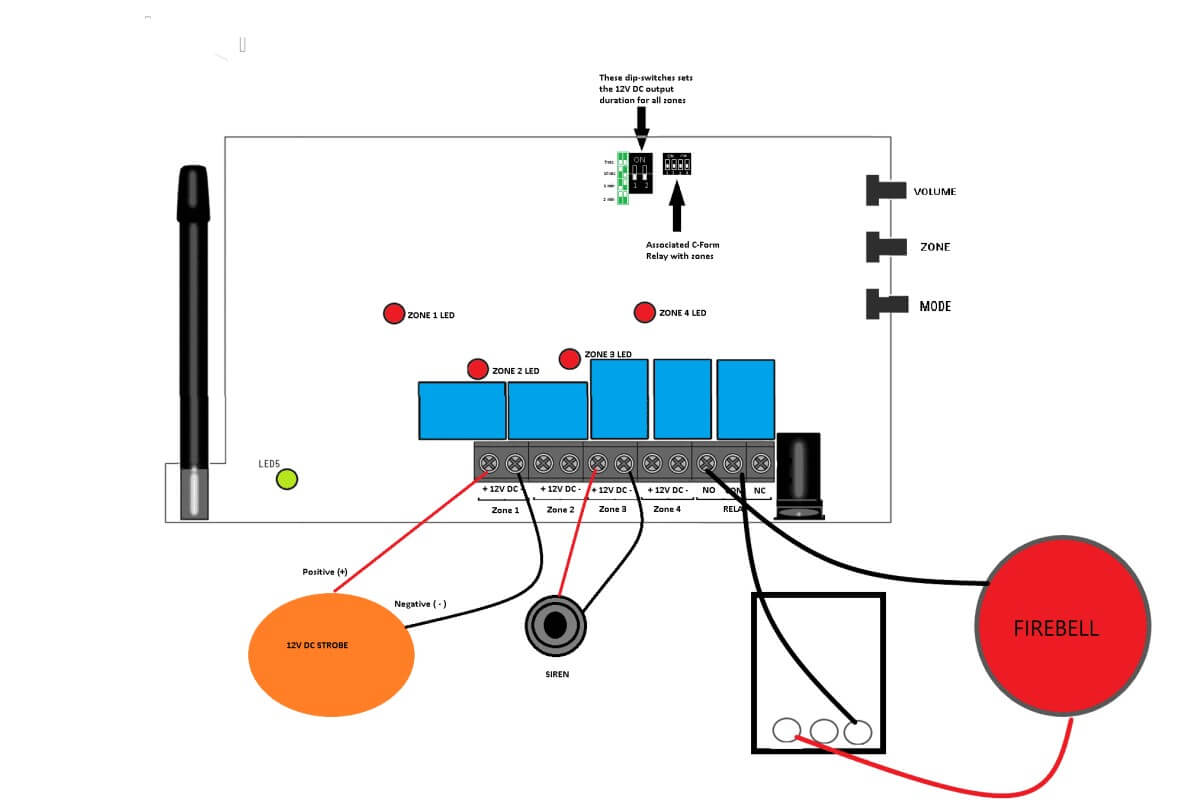
In this example, we will connect a 12V DC fire alarm bell to the relay and assume you already have a push-button programmed to zone one (1). The C-Form relay will only be activated when a transmitter programmed to zone 1 is triggered.
1) Ensure the plug-in transformer is NOT plugged in, and the ERA-DCRX receiver is NOT plugged in.
2) The next step is associating the C-Form relay with a zone(s). Reference the small dip switches in “fig 2” in the drawing below. Set dip switch 1 up, and ensure 2, 3, & 4 down. This setting associates the C-Form relay with zone 1.
3) Set duration time. Set the drip switches according to the drawing in “Fig 1.” This will determine how long the external device will turn on.
4) Connect the black wire from the fire bell to the “NO” terminal screw on the section labeled “relay.”
5) Connect the red wire from the fire bell to the left terminal screw on the plug-in transformer.
6) Use a wire to connect the right terminal screw on the plugin transformer (ignore the center screw on the transformer) to the “COM” terminal screw on the ERA-DCRX output section labeled relay.
7) Plug everything back in and start using!
More in ERA Product FAQ
Browse the full FAQ category or continue with related answers from the same FAQ category.