
Extending ERA Product Range: Connecting ERA-UTX to ERA-DCRX C-FORM Relay
This guide explains how to connect the ERA-UTX to the C-FORM relay on the ERA-DCRX, effectively creating a relay or extender to increase the operating range of ERA products by an additional 4,000 ft. Detailed Use Case Example Consider a scenario where a customer has purchased an ERA-DCKIT, which includes: Initial setup: Solution: Introduce an…
This guide explains how to connect the ERA-UTX to the C-FORM relay on the ERA-DCRX, effectively creating a relay or extender to increase the operating range of ERA products by an additional 4,000 ft.
Detailed Use Case Example
Consider a scenario where a customer has purchased an ERA-DCKIT, which includes:
- ERA-PBTX (push button transmitter)
- ERA-RXPG (plugin receiver)
Initial setup:
- The user programs the ERA-PBTX to the ERA-RXPG.
- After programming, the user experiences interference and does not get consistent notifications.
Solution: Introduce an ERA-DCRX with an ERA-UTX connected to its C-FORM relay to increase the signal range up to 4,000 ft.
New setup:
- Program the original ERA-PBTX to the new ERA-DCRX (the one you are wiring the ERA-UTX into).
- Program the new ERA-UTX (that is wired into the ERA-DCRX) to the original ERA-RXPG.
Chain of events after setup:
- ERA-PBTX is triggered (the user pushes the push button).
- The new ERA-DCRX receives the signal and plays a chime sound.
- The C-FORM relay on the ERA-DCRX triggers the connected ERA-UTX.
- The ERA-UTX sends out a wireless signal.
- The original ERA-RXPG receives the signal and plays a chime sound.
This setup effectively extends the range and overcomes interference issues.
Connection Instructions
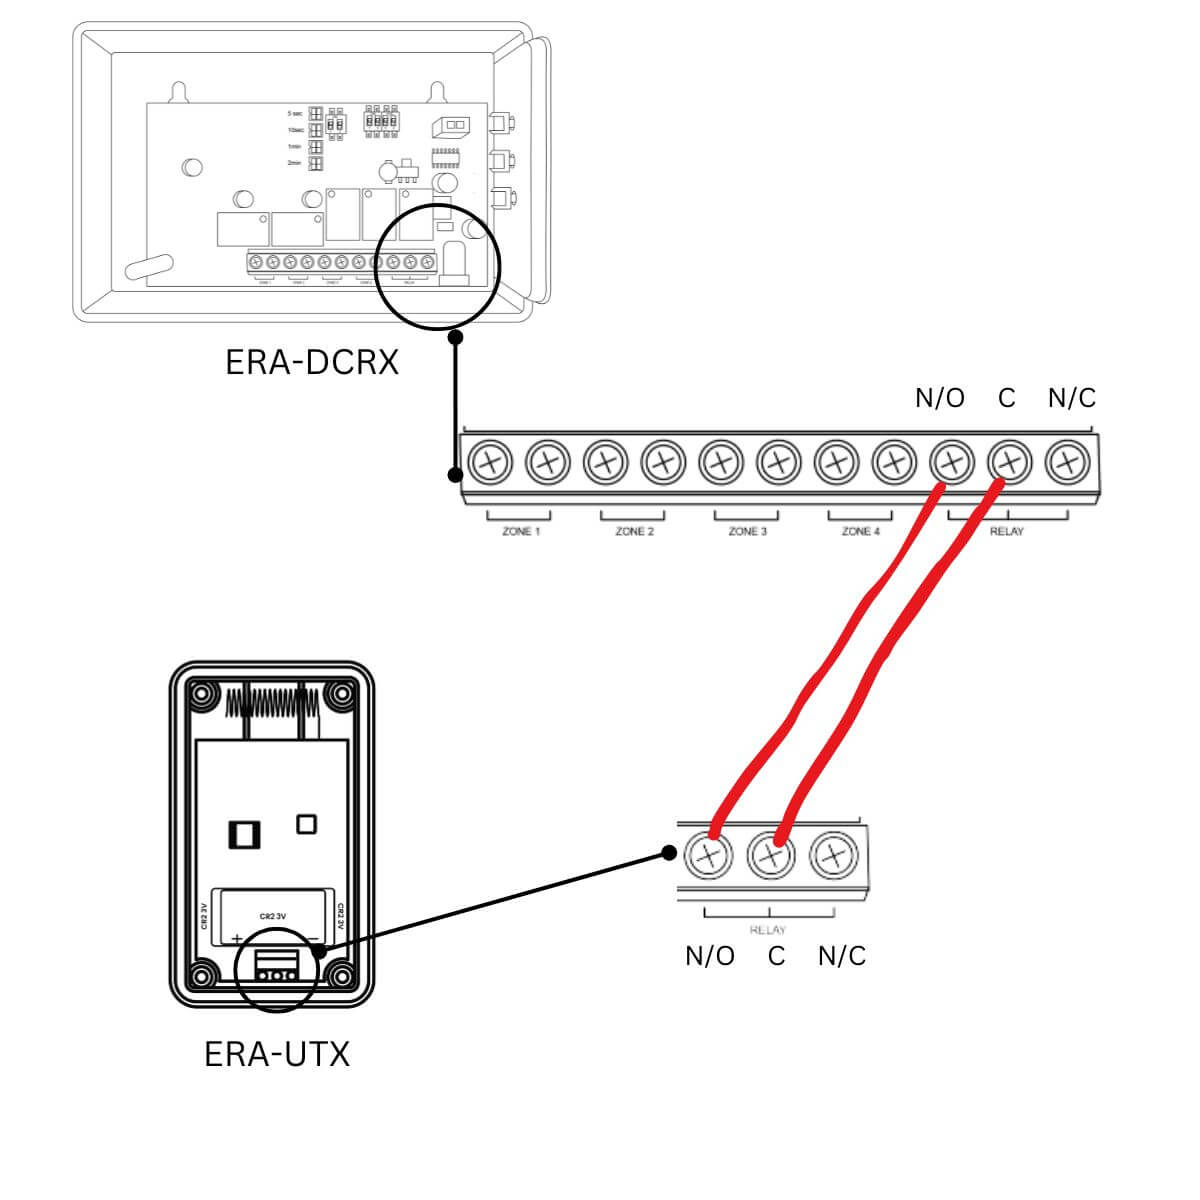
To connect the ERA-UTX to the C-FORM relay of the ERA-DCRX, follow these steps:
- First, refer to the user manuals for both the ERA-DCRX and ERA-UTX for instructions on how to safely remove the covers to access the terminal screws.
- Once the covers are removed:
a. On the ERA-UTX, locate the N/C (Normally Open) screw terminal.
b. On the ERA-DCRX, find the N/C (Normally Open) terminal screw on the C-FORM relay.
c. Connect a wire from the N/C screw on the ERA-UTX to the N/C terminal on the ERA-DCRX. - Next:
a. On the ERA-UTX, find the “C” (Common) terminal screw.
b. On the ERA-DCRX, locate the Common terminal screw on the C-FORM relay.
c. Connect a wire from the Common terminal screw on the UTX to the Common terminal screw on the ERA-DCRX. - After making the connections, carefully replace the covers on both devices.
Programming Instructions
- Program the ERA-PBTX to the new ERA-DCRX: Follow the pairing instructions in the ERA-DCRX manual.
- Program the new ERA-UTX to the original ERA-RXPG: Program the new ERA-UTX to the original ERA-RXPG:
Important Notes
- Ensure all connections are secure and insulated adequately before replacing the covers.
- Test the setup thoroughly after installation to confirm proper functioning.
- The extended range of 4,000 ft is based on line of sight conditions. The actual range may vary depending on environmental factors and obstacles.
- Always consult the specific product manuals for detailed safety instructions and programming procedures.
By following these instructions, you can effectively extend the range of your ERA products and overcome signal issues in challenging environments.
More in ERA Product FAQ
Browse the full FAQ category or continue with related answers from the same FAQ category.