
Using 12V DC Devices with the ERA-DCRX 12V Outputs
The Safeguard Supply, ERA-DCRX receivers feature 12V DC outputs (one per zone) that allow you to connect 12V DC devices for external use. Devices such as strobe lights, sirens, buzzers, and more are connected to terminal screws for each zone, allowing that external device to trigger when that zone is triggered. NOTE: the ERA-DCRX also…
The Safeguard Supply, ERA-DCRX receivers feature 12V DC outputs (one per zone) that allow you to connect 12V DC devices for external use. Devices such as strobe lights, sirens, buzzers, and more are connected to terminal screws for each zone, allowing that external device to trigger when that zone is triggered.
*NOTE: the ERA-DCRX also has a C-FORM relay. This allows the ERA-DCRX to act as a switch for an externally connected device, using the N/O or N/C. External devices using the C-FORM relay will need their external power supply as it will not be delivered by the ERA-DCRX. The 12V DC outputs DO deliver power.
The article here is an example of how to use the C-FORM relay on the ERA-DCRX.
Although you can program multiple transmitters/sensors to an ERA-DCRX zone, only one external device may be wired to a zone. For example, suppose you have a door window contact and a push-button programmed to zone one. When either of those devices is triggered (door opened or push-button pressed), the external device connected to that zone will trigger as well.
How To Wire to the 12V DC Outputs
Below are brief instructions on how to connect a 12V DC device, such as a strobe light, siren, buzzer, etc. to a zone on the ERA-DCRX receiver.
- Unplug the receiver.
- Separate the top of the receiver case from the bottom of the receiver case.
- Locate the terminal block (see image below) located on the bottom of the pc board.
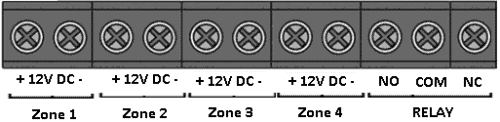
- Loosen screens for the zone(s) that you are going to connect a 12V DC device to using a small Phillips head screwdriver.
- Wire the external 12V DC into the terminal connection blocks that correspond to the respective zone. For example, if a push button is paired to zone 1, and you want a strobe to flash for zone 1, wire the strobe into the terminal block for zone 1.
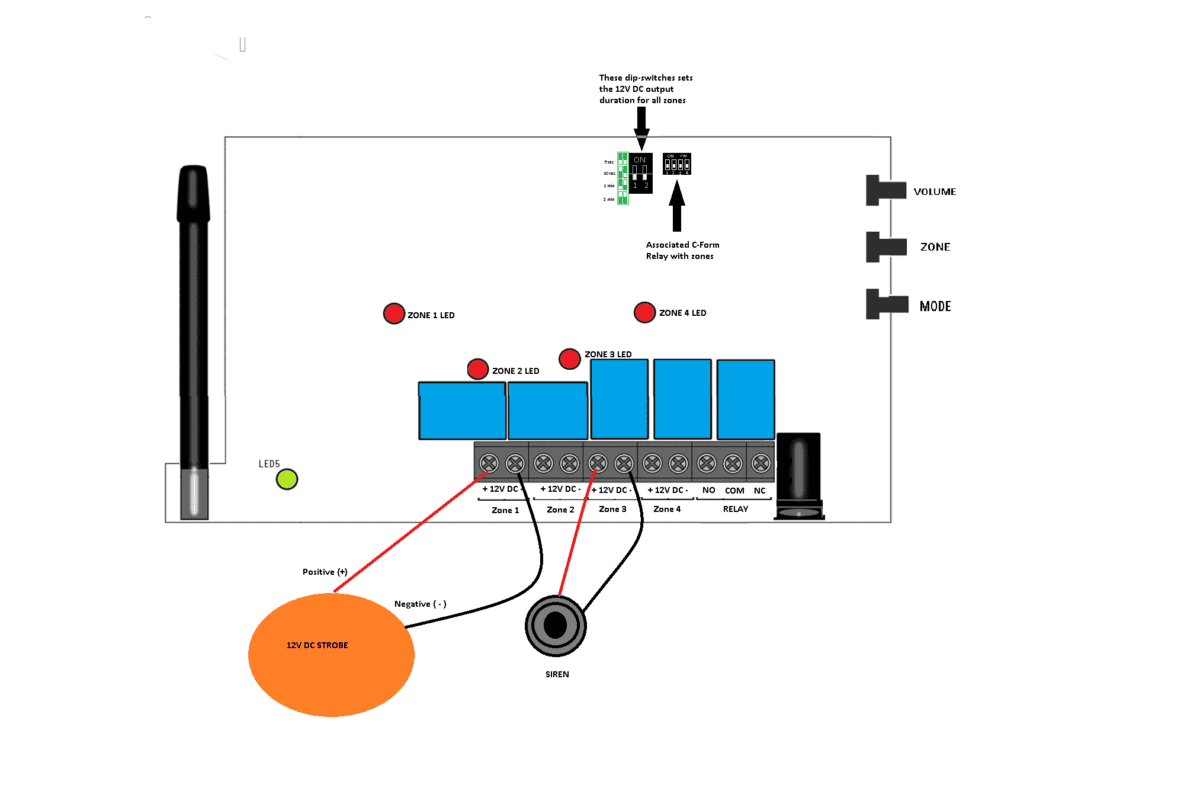
- Observe polarity when necessary. For example, for the strobe lights and buzzer polarity does not matter. For the fire alarm bell, polarity does matter. The RED wire from the fire alarm bell connects to the positive terminal screw, the BLACK wire connects to the negative terminal screw.
- Re-tighten screws on the terminal blocks.
- Adjust output duration as needed.
Duration Outputs on Zones
The output duration for a zone may be set using the dip switches (see diagram below), set for 5 seconds, 10 seconds, 1 minute, and 5 minutes. When set, the duration will be set for all outputs, zones 1-4.
- Snap cover back together.
- Plugin the receiver

More in ERA Product FAQ
Browse the full FAQ category or continue with related answers from the same FAQ category.