
ERA-RXPG Plugin Receiver User Manual
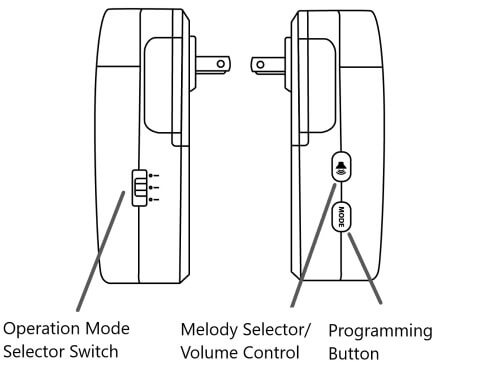
Introduction The ERA-RXPG is a long-range, wireless door chime receiver that plugs into a standard 120V outlet. It is compatible with all ERA transmitters. Helpful Notes Volume Control: The volume button is located on the side of the unit (see Figure 1). Pushing it will scroll through four (4) levels of volume control. Pushing it…
Introduction
The ERA-RXPG is a long-range, wireless door chime receiver that plugs into a standard 120V outlet. It is compatible with all ERA transmitters.
Helpful Notes
- The receiver measures 4.75’’ H x 2.75” W x 1.55” D.
- The unit plugs into a standard 120V outlet.
- The ERA-RXPG has three operational modes: strobe only, sound only, and strobe + sound (see Figure 3).
- The ERA-RXPG has 12 different melodies to choose from.
- The ERA-RXPG may be programmed with up to 12 ERA transmitters. Each transmitter may have a distinct melody.
- There is no limit to the number of ERA receivers that may be used with a compatible ERA transmitter.
- An ERA transmitter’s range (line of site) to the receiver is 4,000 ft.
- The plug for the ERA-RXPG is UL-listed.
Volume Control:
The volume button is located on the side of the unit (see Figure 1). Pushing it will scroll through four (4) levels of volume control. Pushing it a fifth (5th) time will turn the unit off.
ERA-RXPG Modes of Operation:
The ERA-RXPG has three (3) modes of operation. Change the mode of operation by moving the selector switch located on the side of the receiver (see Figure 1.)
- In the top position, the receiver will flash a bright LED strobe light for approximately 12 seconds (no sound).
- In the middle position, the receiver will flash the strobe light and play the melody programmed to the receiver.
- In the bottom position, the receiver will play the selected melody (the strobe will not flash).
Pair Transmitter to the Receiver:
Always test the unit before installation. All ERA transmitters are compatible with the ERA-RXPG receiver, which must be programmed to operate with an ERA-compatible transmitter.
- Ensure the ERA-RXPG is plugged into a standard 120V wall outlet.
- On the ERA-RXPG receiver, hold down the “mode” button (lower button in Figure 1) until you hear a short tone sound & the red LED (inside the front lens cover) begins to blink. This denotes the unit is in programming mode.
- Release this button.
- The first melody is the “ding-dong” sound. If you want to use this melody, skip to the next step. Otherwise, scroll through available melodies by pressing the melody selector button (see Figure 1). Stop pushing this button when you hear the sound you want.
- Trigger the transmitter. Consult the transmitter’s user manual for instructions on how to trigger the transmitter. The receiver will play a quick chime sound, notifying the transmitter is programmed to the receiver. The red LED should still be blinking.
- To program a second transmitter (push button, door contact, motion sensor, or driveway sensor), push the melody selector button (the button on top) to scroll through available melodies. Once you have the sound you want, stop pressing the melody selector button and repeat step 4 above, triggering the sensor/transmitter.
- Once you have programmed all the transmitter(s), exit programming mode by holding down the “mode” button until you hear a short tone sound & the red LED disappears (approx. 3 seconds).
Test the Programming of Transmitter to Receiver:
- Ensure the ERA-RXPG receiver is plugged in & the battery is installed in the ERA transmitter.
- Trigger the transmitter. For example, push the center button on the push button.
- When triggered, the receiver should play the selected melody and/or flash (depending on the mode of operation).
Low Battery Indicator:
When the battery in an ERA transmitter programmed to the ERA-RXPG is low and needs to be replaced, the receiver will double-play the programmed melody, and a red LED will slowly flash on the receiver for approximately 10 minutes.
Clearing the Memory of the ERA-RXPG:
- On the ERA-RXPG receiver, hold down the “mode” button (lower button in Figure 1) until you hear a short tone sound, and the red LED (inside the front lens cover) begins to blink. This denotes that the unit is in programming mode. Release this button.
- Simultaneously, hold the “mode” and “volume” buttons for approximately 5 seconds until you hear a quick chime sound. This notifies you that the ERA-RXPG’s memory has been erased.
More in ERA Product FAQ
Browse the full FAQ category or continue with related answers from the same FAQ category.