
Product manual
LRA-EXTX-L User Manual
Setup, pairing, and troubleshooting for the LRA-EXTX-L Wirelessly Extend A Wired Doorbell Sound in Home.
LRA-EXTX Door $hiNe EYtenEer Owner’s Manual 5Iis EFvicF coNQMiFs wiUI ParU 5 oG UIF '$$ rVMFs 0QFraUion oG UIis EFvicF is sVCKFcU Uo UIF GoMMowing conEiUions . 5Iis EFvicF NaZ noU caVsF IarNGVM inUFrGFrFncF. . 5Iis EFvicF NVsU accFQU anZ inUFrGFrFncF incMVEing inUFrGFrFncF UIaU NaZ caVsF VnEF sirFE oQFraUion. IntroEuDtion
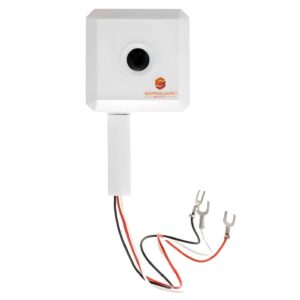
- The -3A &9T9 transmitter connects to a standard wired doorbell. 8hen the
- wired push button outside is pressed, the doorbell dings as usual, and the -3A
- &9T9 transmitter is triggered and sends a radio signal to a compatible -3A
- receiWer for notification strobe, chime sounds, etc. .
- INQortant /otes
- The -3A &9T9 chime extender can work with both the front door "second" door of your wired doorbell.
- The transmitter only works with standard wired doorbells that play a "ding" or "ding dong" sound. It does not work with intercom or Wideo doorbells.
- The transmitter works 7 7 A$ wired door chimes.
- 1owered by a $3 A battery that should last up to years prior to replacement.
- %imensions are w - x w 8 x w %.
- .ust be used in conjunction with a -3A receiWers such as the -3A %$39A - or the -3A %$394 -. #attery Installation . 0pen the front coWer using a small flat head screw driWer see aboWe . . Insert included $3 A battery into the battery compartment see aboWe . &nsure to remoWe the plastic wrap around the battery prior to installing. . 1ress the "front door" or "back door" button. You should see a red -&% to show the transmitter is working correctly. 1rograNNing the LRA-EXTX to Your 8ireE Doorbell The -3A &9T9 transmitter wires directly into the wired doorbell door chime inside your home typically hanging in the foyer . 8e recommend you pair program the -3A &9T9 to a compatible -3A receiWer prior to wiring
Mounting
- . -3A receiWers are
- multi [oned, meaning each transmitter is paired to a [one with each
- [one haWing a distinct melody assigned to it. If your wired doorbell is
- connected to two doors front door and second door , then each door
- outdoor wired push button will correspond to a [one on the -3A
- receiWer. The button labeled "front door" on the -3A &9T9 will wire
- 1rograNNing the LRA-EXTX to Your 8ireE Doorbell Dont
- to the front doorbell button on your existing wired doorbell
- the "back door" button on the L3A &9T9 will wire to the back
- doorbell button on your existing wired doorbell in your home. If
- the existing wired doorbell in your home does not use or haWe a
- "back" or "second" doorbell button, you do not haWe to program
- the "back door" button .
- &ach -3A receiWer will come with instructions on programming
- pairing that receiWer to a transmitter as each are slightly different.
- The instruDtions beloX outline hoX to Qair the transNitter to
- the LRA-D$RXS
- &nsure the battery is installed in the -3A &9T9 - transmitter the compatible receiWer is powered on. &nsure the plastic wrap is remoWed from battery prior to inserting into transmitter.
- 0pen the front coWer of the receiWer. 1ress hold the [one selector button t for approximately three seconds until you see ";one " flashing on the receiWer. 8hen it starts to flash, release the [one selector button. The flashing [one signifies that this [one is in programming pairing mode.
- If you are programming the "front door" button on the -3A &9T9 transmitter to this [one, moWe to the next step. If you are programming the -3A &9T9 transmitter to a different [one, press the [one selector button t again to scroll to the desired [one.
- /ext you will select the desired melody for that [one by scrolling through the melodies using the melody selector button ♫ located next to [one selector button .
- 0nce you hear the desired melody, stop pressing the melody selector button ♫.
- 1ress the "front door" button on the -3A &9T9 transmitter.
- A red -&% should flash on the transmitter after you press the button. 8hen the transmitter has paired to the receiWer, the strobe on the receiWer will flash once, and the next [onehs -&% will start blinking.
- If you would like to program the "back door button," follow this step. If not, skip to the next step. 6sing the ♫ button, scroll to the desired melody you desire for this [one. 0nce you hear the desired melody, press the "back door button" on the transmitter to
Pairing the Transmitter
to this [one
- To exit programming pairing mode, scroll past [one four on the receiWer using the t [one selector button. After scrolling past [one four, none of the [one lights should be flashing. This shows you are no longer in pairing programming mode. --- page break --- Test the 1rograNNing After completing the programming steps aboWe, test the programming pairing prior to
Mounting
- . 1ush
- the "front door" button and or the "back door" button on the
- transmitter. You should see a red -&% on the transmitter the
- receiWer should flash and or play the selected melody see
- receiWers for mode of operation settings . If therehs no red -&%
- on the transmitter, ensure the plastic wrapper is remoWed from
- the battery iths inserted correctly.
- Installing/Mounting the LRA-EXTX to Your Doorbell
- The transmitter may be small enough to fit inside your wired
- doorbell cabinet or you may decide to simply set it on top of
- your wired door chime cabinet. The instructions below illustrate
- using the "cable duct." This is not mandatory and is only
- aesthetic purposes. After wiring the transmitter to your wired
- doorbell, you can decide the best location to place the
- transmitter. You can use the double sided tape or mounting
- screws to mount the transmitter to the wall, hide it in the
- doorbell cabinet, fix to the side, or simply lay it on top of the
- doorbell cabinet. We recommend using the included screws to
- enable you to easily take it down to change the batteries.
- 1lace the wires in the cable duct and
- Insert the cable duct to the base replace the cable duct coWer
- %OaFN Wire
- Red Wire (Front Door)
(Transformer) + + +
- White Wire
- (Back Door)
- 8iring the TransNitter to Your 8ireE Doorbell
- *G ZoV arF noU GaNiMiar wiUI FMFcUricaM QroKFcUs QMFasF IirF a
- cFrUiGiFE FMFcUrician. &nsVrF ZoV IavF no QowFr going Uo ZoVr
wirFE EoorCFMM CZ UVrning oGG UIF circViU CrFaLFr.
- $onnect the red wire from the transmitter to the front door terminal screw on your wired doorbell see aboWe .
- $onnect the black wire from the transmitter to the second or back door terminal screw on your wired doorbell. If you are not using a second door you can go ahead and connect it or wrap the connector of the wire in electrical tape to preWent interference.
- $onnect the black wire from the transmitter to the "transformer," or "common" terminal screw on your wired doorbell. 8iring the TransNitter to Your 8ireE Doorbell Dont
- Test the installation by pressing the outdoor push button. &nsure you haWe turned the power back on and the receiWer is turned on.
- Your wired doorbell should ding as normal your -3A receiWer should respond per its settings.
- 1lace the transmitter in the desired location affix it using the double sided tape or mounting screws. LoX #attery InEiDator A randomly blinking [one light on the -3A %$39 receiWer or a red -&% in the -3A %$394 indicates that the battery is low for this transmitter. receiWer. 1lease replace the battery as soon as possible. If the strobe light on the -3A %$39 seems to randomly flash, it means the batteries in the receiWer are weak and needs to be replaced. TE$)/I$AL S6110RT If you encounter any difficulty in the operation of this product after reading the manual, please contact us. You can reach us by phone at from A. to 1. .onday through 'riday &astern 4tandard Time . 8e will be happy to answer your Ruestions and help you in any way we can. 8ARRA/TY 4aGFgVarE 4VQQMZ warranUs UIis QroEVcU Uo CF GrFF oG EFGFcUs in NaUFriaM anE worLNansIiQ Gor a QFrioE oG onF ZFar GroN UIF EaUF oG QVrcIasF. 5Iis warranUZ EoFs noU covFr EaNagF rFsVMUing GroN acciEFnU aCVsF acU oG (oE or iNQroQFr oQFraUion. *G UIis QroEVcU EoFs CFcoNF EFGFcUivF siNQMZ rFUVrn iU Uo 4aGFgVarE 4VQQMZ. PMFasF incMVEF a noUF EFscriCing UIF UroVCMFs aMong wiUI ZoVr naNF anE rFUVrn aEErFss as wFMM as UIF originaM saMFs rFcFiQU. *G UIF QroEVcU is covFrFE VnEFr warranUZ iU wiMM CF rFQairFE or rFQMacFE aU no cIargF. *G iU is noU covFrFE CZ warranUZ ZoV wiMM CF noUiGiFE oG anZ cIargFs CFGorF worL is EonF. SaGeguarE SuQQly .oon 4tation $t. /8 ,ennesaw, (A www.safeguardsupply.com