
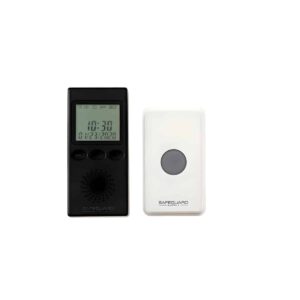
ERA-UTVPR User Manual
Setup, pairing, and troubleshooting for the ERA-UTVPR Portable Doorbell or Door Contact with Vibrating Receiver.
- ERA-VPRX Vibrating
- Portable Receiver
- Owner’s Manual
This device complies with Part 15 of the FCC rules, Operation of this device is subject to the following conditions: 1. This device may not cause harmful interference. 2. This device must accept any interference, including interference that may cause unde-sired operation.
Introduction
The ERA-VPRX is a portable receiver compatible with all ERA products. It may be purchased separately, but must be used with compatible ERA transmitters/sensors.
What's Included
- Portable Receiver
- Charger Cord & Charger Brick
- User Guide Compatible Products:
- ERA-UTX - push button and/or magnetic door contact transmitter
- ERA-PIR - indoor motion activated PIR sensor/transmitter
- ERA-DSTX - outdoor motion activated PIR sensor/transmitter used primarily for driveway monitoring
- ERA-DCRX - desktop receiver with 12v dc outputs Features of the ERA-VPRX:
Volume Control
(mute + four levels)
- Vibrating mode (may be set to on/off)
- Powered by rechargeable Li-Ion battery capable of holding charge for approximately 6-7 days (usage dependent); charging cable and brick included
- Belt Clip
- Works with up to 16 different transmitters; each transmitter may have a unique melody assigned to it
- Up to 4,000 ft. range from transmitters to receiver
- Stores up to 200 event logs
- LCD display lights up for easy viewing
- Unit "auto locks" when not in use for 15 seconds Locking/Unlocking the Keypad: the key icon displays when the keypad is locked. The receiver auto-lokcs after 15 seconds of inactivity. The keypad is locked & unlocked by pressing & releasing the up arrow button & the down arrow button at the same time. The keypad must be unlocked for all programming functions.
Pairing the Transmitter
Pair up to 16 different sensors to each ERA-VPRX. 1. Press & release the POWER button (see figure 1) to clear "ZONE" & "TTL" from the LCD screen. 2. Unlock the keypad (see "Locking/Unlocking the Keypad"). 3.
At the same time, press & release the MODE button & the up arrow button . 4. The phrase "COdE LEArnInG" will display on the LCD screen (see figure 2).
- 5. Use the down arrow button to scroll to the zone you want to
- program. *Note: if this zone is already occupied by a transmitter, "USE" will
- display one the LCD screen. See "Deleting a Transmitter/Sensor From a Zone".
- 6. Next, program the melody you would like this zone to play by pressing
the up arrow button . 7. Activate the transmitter/sensor you want to program to the zone. Consult the specific transmitter manual to activate that sensor/transmitter.
- 8. Upon successful activation, the zone will show "USE", indicating a
- transmitter/sensor is occupying that zone.
- 9. Repeat steps 5-8 to program additional transmitters/sensors to the
- receiver.
- 10.When you are done programming, press & release the power button
to exit programming mode.
- Settings: volume, vibrate, setting the time & date. Note: the MODE
- button will be used to scroll to all the settings detailed below.
- Press & release the POWER button (see figure 1) to clear "ZONE" &
"TTL" from the LCD screen. Volume: 1. Unlock the keypad (see "Locking/Unlocking the Keypad"). 2.
Press and release the mode button . 3. The speaker icon will appear & flash on the LCD screen. 4. Use the up & down arrow buttons to select the desired volume level (0 mutes, 4 is is the highest volume level).
Vibrate: 1. Unlock the keypad (see "Locking/Unlocking the Keypad").
- 2. Press & release the MODE button until the vibrate icon flashes
- on the LCD screen.
- 3. Press the up or down arrows to switch the vibrate mode to "on" or "off."
Time/Date: 1. Unlock the keypad (see "Locking/Unlocking the Keypad"). 2. Press & release the MODE button until the the hour begins to flash.
- 3. While the hour is flashing, use the up & down arrows buttons
- to select the desired hour.
- 4. Press the MODE button again to scroll to month, date, and year, using the up &
- down arrow buttons to adjust the settings accordingly.
- 5. When done programming the time & date, press & release the power button
(see figure 1) to exit programming mode.
--- page break ---
Deleting a Transmitter/Sensor From a Zone: 1. Press & release the POWER button (see figure 1) to clear "ZONE" & "TTL" from the LCD screen. 2. Unlock the keypad (see "Locking/Unlocking the Keypad"). 3.
Enter programming mode by pressing & releasing the MODE button & up arrow button . 4. Use the down arrow button to scroll through the zones (1-16). 5. If the display reads "USE," the zone is occupied by a transmitter/sensor.
- 6. To delete the sensor from a zone, press & hold the MODE button for 2
- seconds, until "DEL" & "COdE Clearing" appear on the screen (see figure 3).
- 7. At the same time, press the MODE button & down arrow button
- & release. You can program a sensor to that zone or press the down arrow
- button to move to the next zone.
- 8. To exit this programming mode, press & release the POWER button
(see figure 1).
- Low Battery Alert Display: If a programmed transmitter/sensor has a
- low battery , the ERA-VPRX will read "LO bAttEry" when a signal is
- received from that sensor (see figure 4.) See transmitter/sensor
instructions for installing a new battery for that transmitter/sensor.
- Charging the ERA-VPRX: Use the included USB micro charger included
- with this kit, although any USB micro charger will work. The battery icon
- will blink while charging. Typical time to full charge is 6-8 hours.
- Turning the ERA-VPRX on/off: When off, press & hold the power button
- (see figure 1) for approximately 2 seconds. To turn unit off, unlock the
- keypad (see "Locking/Unlocking the Keypad"), then press & hold the
- power button until the unit powers off.
- Alert Log: The ERA-VPRX can store up to 200 event logs for each of the zones
with time & date stamp. Alert Log (cont.):
- Melody Selection Note: Each sensor can only occupy one zone
- of the ERA-VPRX. If you program a sensor more than once, it will
- remember the last zone it was programmed to and will no longer
be programmed to the previous zone. Available Melodies:
- Ding Dong (high)
- Ding Dong (low)
- Westminster
- Fur Elise
- Alarm/Siren
- Coo Coo Clock
- Bird Chirping
- Twinkle Twinkle
- William Tell
- Cannon in D
- Morning
- Toreador March
- Beep (high)
- Beep (low)
- Beep, Beep
- Beep, Beep, Beep, Beep Factory Default: To delete all settings & sensor memory, use a small paper clip to poke through the hole between the power button & the USB charging port. You will feel a small click when you press the reset button. The display will default to the original factory setting and no senors will be programmed to the ERA-VPRX. TECHNICAL SUPPORT If you encounter any difficulty in the operation of this product after reading the manual, please contact us. You can reach us by phone at 904-245-1184 from 8:00 AM to 5:00 PM Monday through Friday (Eastern Standard Time). 1. Press & release the power button to clear "Zone” and “TTL” from the LCD screen. 2. To view the log, first unlock the keypad (see "Locking/Unlocking the Keypad"). We will be happy to answer your questions and help you in any way we can.
Warranty
- Safeguard Supply warrants this product to be free of defects in material and
- workmanship for a period of one year from the date of purchase. This warranty
- Use the down arrow button to toggle through the 16 zones to see the total (TTL)
3. number of activations.
- 4. To view the history of a zone, use the up arrow button to toggle back
- through the history. The most recent activation will appear first.
- 5. To clear the event log for any given zone, press and hold the MODE button for 2
seconds while in that zone. The display will read “rECd” "CLEArInG” (figure 5). 6. Press the MODE button & down arrow button at the same time & release.
- does not cover damage resulting from accident, abuse, act of God or improper
- operation. If this product does become defective, simply return it to Safeguard
- Supply. Please include a note describing the troubles along with your name and
- return address as well as the original sales receipt. If the product is covered under
- warranty it will be repaired or replaced at no charge. If it is not covered by
- warranty, you will be notified of any charges before work is done.
- Safeguard Supply
- 2260 Moon Station Ct. NW #110
- Kennesaw, GA 30144
www.safeguardsupply.com