
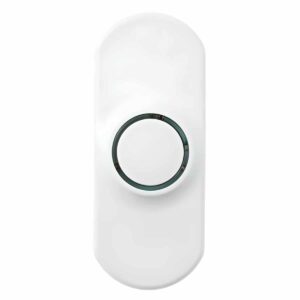
ERA-PBTX User Manual
Setup, pairing, and troubleshooting for the ERA-PBTX Wireless Doorbell Push Button 4,000 ft Range for Business & Home Use.
ERA-PBTX Wireless Push Button
Introduction
- The ERA-PBTX is a long-range wireless doorbell push button compatible with all
- ERA receivers. This manual outlines how to program the ERA-PBTX push button
- to an ERA receiver and will serve as the product manual for the kit and its
products.
Helpful Notes
- All ERA transmitters are compatible with all ERA receivers.
- The ERA-PBTX is a push-button transmitter that must be programmed with an ERA-compatible receiver.
- The push button is outdoor rated and contains a silicone gasket to keep moisture out. Mount it with the small weephole pointing down to ensure any moisture in the unit evaporates.
- Push button measures 3.00'' H x 2.25'' W x 1.75'' D.
- The halo ring around the center push will illuminate dimly for visibility at night.
- Then, when triggered (the center push button is pressed), the center halo will illuminate brightly for approximately 2 seconds.
- When programming multiple transmitters to an ERA receiver, the common practice is to program a distinct melody for each programmed transmitter to distinguish which transmitter was triggered.
Battery Installation
- *This product contains a coin battery that could be dangerous to children. Please review
- the warnings regarding the batteries at the end of this manual.
- The ERA-PBTX comes with a battery installed. Pull out the plastic tab to activate
- the battery. Test the button by pressing the center push. The green halo LED
lighting should illuminate around the center push. Replacing the Battery: 1. Remove the silicon casket around the ERA-PBTX.
- 2. Open the front cover by removing the silicon gasket sleeve around the
- push button. Insert the included screwdriver into the square hole on the
- bottom of the unit (figure 1), gently push, and then separate the top and
bottom halves of the case. 3. Remove the top part of the case from the lower part of the case (figure 2). 4. Install the included CR2450A 3V battery into the battery holder with the positive (+) side of the battery facing up (figure 2). 5.
Replace the silicon gasket around the push button.
- 6. Test the battery by pressing the center push. The green halo should
- illuminate for approximately 2 seconds, signaling transmission. Note:
- Program the push button to a compatible receiver before mounting the
push button.
Pairing the Transmitter
- (always test the unit before installation)
- The transmitter works with all ERA receivers. Basic programming requires the
- user to program a transmitter to the receiver and select a melody for the receiver
to play when triggered by the transmitter.
--- page break ---
- Each ERA receiver may vary in how it is put into programming mode. Consult
- the “Pair to Receiver” section in the receiver’s usual manual for details. Once
- the receiver is in programming mode.
- Once the transmitter is successfully programmed to the receiver, follow the
- receiver’s manual to change the melody, program an additional transmitter, or exit
- programming mode.
- 1. Ensure the battery is installed in the ERA-PBTX
- 2. Ensure the receiver you are programming the transmitter to is powered
- on and working correctly.
- 3. Put the receiver in programming mode. Consult the receiver’s user
- manual & follow the instructions for putting it into programming mode.
- 4. Press the center button to trigger the ERA-PBTX transmitter. The green
- halo around the center button should illuminate brightly.
- 5. The receiver will respond by notifying you that the push button has been
- successfully programmed to the receiver. Consult the receiver’s user
- manual for details.
- 6. Follow the receiver’s instruction manual to exit programming or to
- program an additional transmitter/sensor.
- Test the
Programming
of Transmitter to Receiver:
- Once programmed, trigger the push button by pressing the center button. Ensure the receiver is plugged in and turned on.
- Test the range between the push button and receiver before mounting the push button.
- Press the center button to trigger the ERA-PBTX transmitter. The green halo around the center button should illuminate brightly.
- When triggered, the receiver should play a melody or chime sound. Mounting the Push Button: Ensure you have programmed & tested the push button before mounting. There are two
Mounting
- 1) using the supplied double-sided tape and 2) using the supplied
- mounting screws.
- 1. Open the front cover by inserting the included screwdriver into the
- square hole on the bottom of the unit (figure 1), and gently push in to
separate the top & bottom parts of the push button. 2. Remove the top half of the case from the lower half of the case.
- 3. Place the case's back cover on the wall where you want to mount it. The
- back cover may be mounted using the supplied screws or the double-
- sided tape.
- 4. Ensure the arrow on the back cover is pointed up (figure 3) and mount it
- to the wall.
- 5. Put the top half (with battery installed) over the bottom half and snap it
- closed.
- Low Battery
- Indicator:
- When the battery in
- the ERA-PBTX is
- low and needs to be
- replaced, it signals
- the receiver to
- double-play the
- programmed melody
- when triggered.
- For example, if you
- have programmed the
- receiver to play the 4-
- note Westminster
- Chime when the push
- button is triggered,
- the receiver will play
- the 4-note
- Westminster Chime
twice in a row.
Programming
with Other Receivers: The ERA-PBTX is compatible with all receivers in the ERA series. Programming is similar, except for programming mode and melody selection/change. Please consult the receiver’s manual when programming.
--- page break ---
- TECHNICAL SUPPORT
- After reading the manual, please contact us if you encounter any difficulties
- operating or programming this product. You can reach us by phone at
904-245-1184 or by email at info@safeguardsupply.com.
Warranty
- Safeguard Supply, an LHE, Inc. company, warrants this product to be free of
- defects in materials and workmanship for a period of one year from the date of
- purchase. This warranty does not cover damage resulting from accident, abuse, act
- of God, or improper operation. If this product does become defective, simply
- return it to Safeguard Supply. Please include a note describing the troubles along
- with your name and return address as well as the original sales receipt. If the
- product is covered under the warranty, it will be repaired or replaced at no charge.
- If it is not covered by the warranty, you will be notified of
any charges before work is done.
FCC Compliance
- This equipment complies with FCC radiation exposure limits set forth for an uncontrolled
- environment. This equipment should be installed and operated with minimum distance
- 5mm between the radiator and your body. This transmitter must not be co-located or
- operating in conjunction with any other antenna or transmitter.
- This device complies with Part 15 of the FCC Rules. Operation is subject to the following
two conditions: (1) this device may not cause harmful interference, and (2) this device must
- accept any interference received, including interference that may cause undesired
- operation.
- changes or modifications not expressly approved by the party responsible for compliance
- could void the user’s authority to operate the equipment.
- This equipment has been tested and found to comply with the limits for a Class B digital
- device, pursuant to Part 15 of the FCC Rules. These limits are designed to provide
- reasonable protection against harmful interference in a residential installation. This
- equipment generates, uses and can radiate radio frequency energy and, if not installed and
- used in accordance with the instructions, may cause harmful interference to radio
- communications. However, there is no guarantee that interference will not occur in a
- particular installation.
- If this equipment does cause harmful interference to radio or television reception, which
- can be determined by turning the equipment off and on, the user is encouraged to try to
correct the interference by one or more of the following measures:
- Reorient or relocate the receiving antenna.
- Increase the separation between the equipment and receiver.
- Connect the equipment into an outlet on a circuit different from that to which the receiver is connected.
- Consult the dealer or an experienced radio/TV technician for help.
- remove and immediately recycle or dispose of used batteries according to local regulations and keep away from children. DO
- NOT dispose of used batteries in household trace or incinerate.
- Call a local poison control center for treatment information.
- This product uses a Lithium CR2450 coin style battery with a nominal voltage of 3V.
- Non-rechargeable batteries are not to be recharged.
- DO NOT force discharge, recharge, disassemble, heat above (manufacturer's specified temperature rating) or incinerate. Doing so may result in injury do to venting, leakage, or explosion resulting in chemical burns.
- Ensure the batteries are installed correctly according to polarity (+ and -).
- DO NOT mix old and new batteries, different brands or types or batteries, such as alkaline, carbon-zinc, or rechargeable batteries.
- Remove immediately and recycle or dispose of batteries from equipment not used for an extended period of time according to local regulations.
- Always completely secure the battery compartment. If the battery compartment does not close securely, stop using the product, remove the batteries, and keep them away from children.