
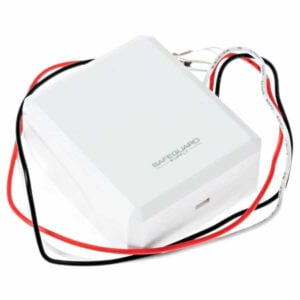
ERA-EXTX User Manual
Setup, pairing, and troubleshooting for the ERA-EXTX Hear Your Wired Doorbell Throughout Your Home.
ERA-EXKIT
- Owner’s Manual
- This device complies with Part 15 of the FCC rules, Operation of this device is subject to
- the following conditions: 1. This device may not cause harmful interference. 2. This
- device must accept any interference, including interference that may cause unde-
sired operation.
Introduction
- The ERA-EXTX is a Transmitter compatible with the ERA-DCRX, ERA-VPRX,
- and the ERA-RXPG Receiver. The ERA-EXTX is a wireless transmitter that is
- wires to the terminal screws in a wired doorbell. When a visitor presses the
- push button (typically located next to the front door) the wired
- doorbell will ring as normal, and this transmitter will send a radio signal to
a compatible receiver and play pre-selected melody.
Helpful Notes
- This product IS NOT a standalone product. It must be programmed to a compatible ERA receiver.
- The ERA-EXTX works with two wired doorbell push buttons, typically labeled as "front" and "back." Each may be programmed to play a distinct melody on a compatible transmitter.
- The transmitter only works with standard wired doorbells that play a "ding-dong" and/or a "ding" sound. It is not supported with intercom or video-based doorbell systems.
- The transmitter is compatible with a 9V-18V AC wired door chimes.
- The transmitter is powered by a long lasting CR123A lithium battery (included).
- Unit measures 1.75'' H x 2.00'' W x 0.75'' D.
- The wires are approximately 10'' in length.
- Although transmitter installation is straight-foward, we recommend contacting a qualified electrician if you are not comfortable installing low-voltage products. ** Please ensure power to your wired doorbell is cut-off prior to installation.
Battery Installation
(figure 1) CR123A 3V 1. Open the front cover by insert a small flat-head screw driver (figure 1). into the small notch on the cover & gently pushing in. 2. Remove top half of case from lower case. 3.
Install the included CR123A battery in the holder.
- 4. Test the battery by pressing the "front" or "back" button. The red LED
- located in the center of the unit should light.
- Note: Program the transmitter to the compatible receive prior to wiring the
transmitter & replacing the cover.
Pairing the Transmitter
- Always test the transmitters programming prior to wiring & mounting the
- receiver.
- The transmitter works with all ERA receivers. Basic programming calls
- for the user to pair the transmitters with a receiver & select a melody for
- the transmitter to instruct the receiver to play when triggered. In the
- example below, the transmitter will be programmed to the ERA-RXPG.
- If you are using a different ERA receiver, follow the programming
- instructions for that receiver to put the receiver in programming mode
- and to change the melody.
- 1. Plug in the receiver (figure 3). Ensure the battery is installed in the
- ERA-EXTX (figure 2). Hold down the "mode" (bottom button in
- figure 3 below) button until you hear a short tone sound & the red
- LED starts to flash. The flash of the red LED denotes the unit is in
- programming mode.
- 2. Scroll through the melodies on the receiver by pressing the
- volume/melody selector button (figure 3). One you have the
melody you want to use, stop pressing the button. 3. Press the "font" button on the ERA-EXTX transmitter (figure 3). 4. If you are not using a second wired doorbell button, skip this step.
- To program the "back" button, press the volume button on the
- receiver again (figure 3) to select a different melody . Once you
- have selected the melody, stop pushing the volume button. Push
- the "back" button (figure 2) on the ERA-EXTX transmitter.
- 5. To exit program mode, hold down the "mode" (top button in figure
- 3) until you hear a short tone sound (approx 3 sec).
- CR123A 3V
- (figure 2) (figure 3)
--- page break ---
Test the
Programming
of Transmitter to Receiver:
- Push the "front" button and/or the "back" button on the transmitter.
- After completing the programming steps above, test the programming pairing prior to
Mounting
. You should see a red LED on the transmitter, & the receiver should play the selected melody (make sure volume is on).
- If there's no red LED on the transmitter, ensure the plastic wrapper is removed from the battery & it is inserted correctly. How to Wire the Transmitter to Your Wired Doorbell: *If you are not familiar with electrical projects, please hire a certified electrician. Ensure you have no power going to your wired doorbell by turning off the circuit breaker. (figure 4) 1. Remove the cabinet cover from your wired doorbell. This is typically located in the foyer or front hallway of you home. 2. Notice the 3-terminal screws on the wired doorbell mechanism (see figure 4). 3. Connect the red wire from the transmitter to the front door terminal screw located on your wired doorbell. 4. Connect the white from the transmitter to the "back" or "second" door terminal screw on your wired doorbell. If you are not using the second door you can still connect the screw or simply wrap the wire connector in electrical tape to prevent interference. 5. Connect the black wire from the transmitter to the "trans" or "common" terminal screw on your wired doorbell. 6. Before
Mounting
- , test the unit by pressing the
- wired doorbell push button (usually located outside your home
- next to the front door). This should trigger the corresponding
- zone on the ERA receiver (typically zone 1).
- 7. If you have a second wired doorbell button & have programmed it
- using these instructions, push the button. Zone 2 on the receiver
- should trigger.
- 8. When testing the "front" & "back" button, your wired doorbell
- should chime as normal. The ERA receiver should play the selected
- melody that correspond to the zone settings you have
programmed. Mounting the Transmitter: It doesn't matter where you mount the the ERA-EXTX transmitter. In most cases, simply placing it on top of the wired door chime cabinet keeps it out of site for most visitors to your home.
- Use the supplied double-sided tape to stick the transmitter above, to the side, or below the wired doorbell mounted on the wall.
- In some cases, there may be enough room inside your wired doorbell cabinet to put the ERA-EXTX inside it.
- As mentioned before, you can also simply sit the transmitter on top of the wired doorbell cabinet.
Programming
with Other Transmitters: The ERA-EXTX is compatible with the ERA-VPRX Portable Receiver & the ERA-RXPG Plugin Receiver. The programming of the ERA-EXTX is very similar for
- these receivers. The only change is how to put the respective receiver into
- programming mode, choosing a melody, & changing the zone. Please
- consult the manual for the specific receiver when programming.
- TECHNICAL SUPPORT
- If you encounter any difficulty in the operation of this product after reading
- the manual, please contact us. You can reach us by phone at 904-245-1184 from
- 8:00 AM to 5:00 PM Monday through Friday (Eastern Standard Time). We will be
happy to answer your questions and help you in any way we can.
Warranty
- Safeguard Supply warrants this product to be free of defects in material and
- workmanship for a period of one year from the date of purchase. This warranty does
- not cover damage resulting from accident, abuse, act of God or improper operation. If
- this product does become defective, simply return it to Safeguard Supply. Please include
- a note describing the troubles along with your name and return address as well as the
- original sales receipt. If the product is covered under warranty it will be repaired or
replaced at no charge. If it is not covered by warranty, you will be notified of any charges before work is done.
- Safeguard Supply
- 2260 Moon Station Ct. NW, #110
- Kennesaw, GA 30144
- Phone: (678) 214-4212
- www.safeguardsupply.com
- Legal Notices
- This device complies with Part 15 of the FCC Rules. Operation is subject to the following
- two conditions: (1) this device may not cause harmful interference, and (2) this device
- must accept any interference received, including interference that may cause undesired
- operation. changes or modifications not expressly approved by the party responsible for
- compliance could void the user’s authority to operate the equipment.
- This equipment has been tested and found to comply with the limits for a Class B digital
- device, pursuant to Part 15 of the FCC Rules. These limits are designed to provide
- reasonable protection against harmful interference in a residential installation. This
- equipment generates, uses and can radiate radio frequency energy and, if not installed
- and used in accordance with the instructions, may cause harmful interference to radio
- communications. However, there is no guarantee that interference will not occur in a
- particular installation.
- If this equipment does cause harmful interference to radio or television reception, which
- can be determined by turning the equipment off and on, the user is encouraged to try to
correct the interference by one or more of the following measures:
- Reorient the receiving antenna.
- Increase the separation between the equipment and receiver.
- Connect the equipment into an outlet on a circuit different from that to which the receiver is connected.
- Consult the dealer or an experienced radio/TV technician for help. WARNIN(: Cancer and Reproductive Harm. Go to www.P65Warnings.ca.gov for more information.