
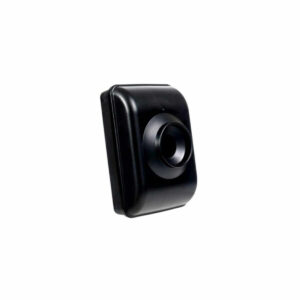
ERA-DSTX User Manual
Setup, pairing, and troubleshooting for the ERA-DSTX Driveway Sensor for ERA Series Alarm Kits.
ERA-DSTX Driveway Alarm Sensor Manual
PRODUCT OVERVIEW
The ERA-DSTX is an outdoor PIR motion sensor. It works with ERA-DCRX and ERA-VPRX receivers. When it detects heat and motion, it sends a wireless signal to the receiver. Maximum wireless range is up to 4,000 feet, line of sight.
PACKAGE CONTENTS
- PIR sensor/transmitter.
- Plate mount.
- Swivel mount.
- Four screws.
- User guide.
IMPORTANT NOTES
- The sensor must be paired to an ERA receiver before use.
- The receiver is sold separately.
- Use one 9V alkaline battery, not included.
- Up to 12 ERA-DSTX transmitters can be programmed to one receiver.
- Each transmitter must be paired to a zone on the receiver.
- There is no limit to the number of receivers that can be paired to one transmitter.
- A low battery causes the receiver to play the programmed melody twice when triggered.
SPECIFICATIONS
- Power: 9V alkaline battery (not included).
- Detection range: Low up to 25 ft; Medium up to 50 ft; High up to 100 ft.
- Wireless range: Up to 4,000 ft, line of sight.
- Size: 4.5 x 3 x 2.25 in.
- Temperature range: -30 to 120 degrees F
- Frequency: 433MHz.
BATTERY INSTALLATION
- Remove the four screws from the back of the case.
- Lift off the top half of the case.
- Connect and install one 9V alkaline battery.
- Leave the case open until pairing is complete. Note: When the battery is weak, the paired zone LED on the receiver may flash for about 10 minutes when triggered.
PAIR TRANSMITTER TO RECEIVER
Test the unit before installation.
- Install the battery and leave the cover off.
- Place the transmitter face-down. This helps prevent unwanted triggers during setup.
- Make sure the receiver is on and working.
- Put the receiver in programming mode. Follow the receiver manual.
- Turn the transmitter over.
- Listen for a brief trill from the receiver. If you do not hear it, wave your hand in front of the sensor until the receiver responds.
- A quick trill confirms successful pairing. Turn it back over.
- Follow the receiver manual to exit programming mode or add more transmitters.
- Replace the cover, insert, and tighten the screws
ADVANCED SETTINGS
Remove the battery before changing any settings. Remove the back cover and disconnect the battery. Jumpers are small black pieces on the circuit board. Move the jumper to the pins for the setting you want. Use tweezers if needed.
SETTINGS
- Range: Changes detection distance.
- LED: Turns the transmit LED on or off.
- Filter: Changes sensitivity. OFF is recommended for indoor use. ON is recommended for outdoor use.
- Reset: Changes the minimum time between alarm activations.
- Range: Changes the distance that the motion detector will detect motion (size of monitored zone). L (low): up to 25 ft. M (medium): up to 50 ft. Hi (high): up to 100 ft.
- LED: Turn LED on/off (LED triggered when unit is transmitting radio signal). OFF: ON: LED lights for 2 seconds when motion is detected.
- Filter: Changes the sensitivity level of the motion detector. Recommended OFF for indoor use, ON for outdoor use). OFF: for indoor use ON: for outdoor use
- Reset: Changed minimum time between alarm activations 120S (120 seconds): waits 120 seconds before the alarm activates again 10S (10 seconds): waits 10 seconds before the alarm activates again
SAFEGUARD SUPPLY
MOUNTING GUIDELINES
Mount the sensor on wood or plastic when possible. Avoid metal surfaces. Obstacles can reduce wireless range.
- Mount on a post, fence, or tree when possible.
- Avoid metal siding and dense trees.
- Mount the unit 3 to 4 feet above the ground.
- Place it about 20 feet from the driveway or path.
- Do not aim it at distant roads. This can cause false triggers.
- Make sure the unit cannot move in wind or storms.
BRACKET SELECTION
- Plate mount: Best for outdoor use on trees, posts, and fences.
- Swivel mount: Best for indoor use.
BRACKET INSTALLATION
- Make sure the arrow on the bracket points up.
- Slide the transmitter down onto the bracket.
- Make sure the LED is at the top of the case.
TECHNICAL SUPPORT
For help with setup or operation, contact Safeguard Supply. Phone: 678-214-4212 | Email: info@safeguardsupply.com.
WARRANTY
This product is warranted against defects in materials and workmanship for one year from the date of purchase. The warranty does not cover damage caused by accident, abuse, acts of God, or improper operation.
If the product is defective, return it with a note describing the problem, your name, your return address, and the original sales receipt. Covered products will be repaired or replaced at no charge. If the product is not covered, you will be notified of any charges before work is done.
FCC STATEMENT
This equipment complies with FCC radiation exposure limits set forth for an uncontrolled environment. This equipment should be installed and operated with minimum distance 5mm between the radiator and your body. This transmitter must not be co-located or operating in conjunction with any other antenna or transmitter.
This device complies with Part 15 of the FCC Rules. Operation is subject to the following two conditions: (1) this device may not cause harmful interference, and (2) this device must accept any interference received, including interference that may cause undesired operation.
changes or modifications not expressly approved by the party responsible for compliance could void the user's authority to operate the equipment.
This equipment has been tested and found to comply with the limits for a Class B digital device, pursuant to Part 15 of the FCC Rules. These limits are designed to provide reasonable protection against harmful interference in a residential installation. This equipment generates, uses and can radiate radio frequency energy and, if not installed and used in accordance with the instructions, may cause harmful interference to radio communications. However, there is no guarantee that interference will not occur in a particular installation.
If this equipment does cause harmful interference to radio or television reception, which can be determined by turning the equipment off and on, the user is encouraged to try to correct the interference by one or more of the following measures:
- Reorient or relocate the receiving antenna.
- Increase the separation between the equipment and receiver.
- Connect the equipment into an outlet on a circuit different from that to which the receiver is connected.
- Consult the dealer or an experienced radio/TV technician for help.
Remove immediately and recycle or dispose of used batteries according to local regulations and keep away from children. DO NOT dispose of used batteries in household trace or incinerate.
- Call a local poison control center for treatment information.
- This product uses an alkaline battery with a nominal voltage of 9V.
- Non-rechargeable batteries are not to be recharged.
- DO NOT force discharge, recharge, disassemble, heat above (manufacturer's specified temperature rating) or incinerate. Doing so may result in injury do to venting, leakage, or explosion resulting in chemical burns.
- Ensure the batteries are installed correctly according to polarity (+ and -).
- DO NOT mix old and new batteries, different brands or types or batteries, such as alkaline, carbon-zinc, or rechargeable batteries.
- Remove immediately and recycle or dispose of batteries from equipment not used for an extended period of time according to local regulations.
- Always completely secure the battery compartment. If the battery compartment does not close securely, stop using the product, remove the batteries, and keep them away from children.
WARNING: Cancer and Reproductive Harm www.P65Warnings.ca.gov