
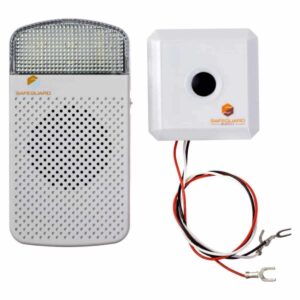
LRA-EX1000S-L User Manual
Setup, pairing, and troubleshooting for the LRA-EX1000S Doorbell Extender to Hear Wired Doorbell in Home.
LRA-EX1000S-L Door Chime Extender
Introduction
The LRA-EXTX-L (transmitter) connects to a standard wired doorbell.
- When the wired push button outside is pressed, the doorbell dings as usual,
- and the LRA-EXTX-L transmitter is triggered and sends a radio signal &
- the LRA-DCRXS-L (receiver) programmed to the LRA-EXTX-L will chime
or flash.
Helpful Notes
These instructions illustrate programming the LRA-EXTX-L to the LRA-DCRXS-L.
- The LRA-EXTX chime extender (transmitter) can work with both the front door & "second" door of your wired doorbell.
- The transmitter only works with standard wired doorbells that plays a "ding" or "ding-dong" sound. It does not work with intercom or video doorbells.
- The transmitter works 9V-18V AC wired door chimes.
- The transmitter is powered by a CR123A battery (included).
Dimensions
of the LRA-EXTX-L are 2-1/4” L x 2-1/4” W x 1/2” D.
- A total of two transmitters may be paired with the LRA-DCRXS-L. The LRA-EXTX/EXTX-L counts as two transmitters if you pair the front & back door.
- The LRA-DCRXS-L has two zones. Each transmitter will occupy a zone. Once two (2) transmitters have been paired to a receiver, you cannot add one unless you delete the existing transmitters from memory.
- Assign one (1) of eighteen (18) available melodies to each transmitter. 1
- The LRA-DCRXS-L has three operational modes: strobe only, sound only, and strobe + sound (see Figure 1).
- When the strobe light is turned on, it will flash for approximately 15 seconds: twice per second for zone one and once per second for zone two.
- There is no limit to the number of receivers you can pair with a transmitter.
- An LRA transmitter's range (line of sight) to the receiver is 1,000 ft.be deleted before re-programming that zone.
- The receiver has three modes of operation: sound only, strobe only, and sound+flash
- Each LRA-DCRXS-L can work with up to two transmitters.
- The LRA-EXTX-L can work with multiple receivers. LRA-EXTX
Battery Installation
Ensure the battery is installed in the LRA-EXTX-L before programming.
- Open the front cover with a small flat-head screwdriver (see .1).
- Insert the included CR123A battery into the battery compartment (ensure you remove the plastic wrap around the battery before installing – see .2)
- Press the "front door" or "back door" button (see Figure 3). You should see a red LED light up to show that the transmitter works correctly. Low Battery Indicator (for programmed transmitter) During regular operation, if you notice the red LED under the strobe lens (see “flasher in Figure 1) tends to stay on after the strobe flashes, this indicates you need to change the battery in a transmitter programmed to the receiver. --- page break ---
Programming
- Transmitter to the Receiver
- Ensure the function switch (see Figure 1) is set to sound mode for
- programming and plugged into a wall outlet and the battery is installed in
the transmitter. A total of two transmitters may be paired with the LRA-DCRXS-L. The LRA-EXTX/EXTX-L counts as two transmitters if you pair the front & back door.
Important Notes When the LRA-DCRXS-L is in programming mode, a red LED will appear. It is essential to understand what the LED means while in programming mode:
- A fast-blinking red LED represents zone 1. Once a transmitter is programmed to this zone, the receiver will jump to zone 2.
- A slow blinking red LED represents zone 2. If you notice a slow blinking LED it means the first zone is occupied, and only zone 2 will accept a transmitter for programming. Once zone 2 is programmed, the LED will be solid red (not blinking).
- Solid LED means both zones are already occupied. If you are trying to program a transmitter and see the red LED, you need to clear the memory of the LRA-DCRXS-L. Programming Steps 1. Ensure the LRA-DCRXS-L is plugged into a standard wall outlet and the battery is correctly installed in the LRA-EXTX-L push button. 2. Press on hold the
- learn button (see Figure 1) for three seconds. A red LED light will blink, indicating the receiver is in pairing mode (see important notes above). Release the
- learn button once you notice the red LED. 3. Press & release the ♫ melody selector button to scroll through available melodies. Stop pushing this button when you hear the sound you want the receiver to play when the transmitter is triggered. 4. Push the “front door button” (see Figure 3) on the LRA-EXTX-L. The receiver will play a quick ding sound, notifying the transmitter that it is programmed to the receiver. 5. If you are only programming for the front door, go to the next step. To program the “back door,” push the ♫ melody selector button to scroll through available melodies. Stop pushing this button when you hear the sound you want the receiver to play for the back doorbell button. 6. Once you have completed programming, exit programming mode by pressing the
- learn button (see Figure 1). 2 Installing/Mounting the LRA-EXTX to Your Doorbell The transmitter may be small enough to fit inside your wired doorbell cabinet or you may decide to set it on top of your wired door chime cabinet. The instructions below illustrate using the "cable duct" (see Figure 4). This is not mandatory and is only for aesthetic purposes. After wiring the transmitter to your wired doorbell, you can decide the best location to place the transmitter. You can use double-sided tape or mounting screws to mount the transmitter to the wall, hide it in the doorbell cabinet, to the side, or lay it on top of the doorbell cabinet. We recommend using the included screws to enable you to take it down to change the batteries quickly. --- page break --- Wiring the LRA-EXTX-L to Your Wired Doorbell *If you are not familiar with electrical projects, please hire a certified electrician. Ensure you have no power going to your wired doorbell by turning off the circuit breaker.
- Connect the red wire from the transmitter to the front door terminal screw on your wired doorbell (see Figure 5).
- Connect the white wire from the transmitter to the second or back door terminal screw on your wired doorbell. If you are not using a second door, you can connect it anyway or wrap the connector of the wire in electrical tape to prevent interference.
- Connect the black wire from the transmitter to the "transformer" or "common" terminal screw on your wired doorbell.
- Turned the power back on. Test the installation by pressing the outdoor push button.
- Your wired doorbell should ding as usual & your LRA receiver should respond per the mode settings (see Figure 1).
- Place the transmitter in the desired location & affix it using double-sided tape or mounting screws. Clearing the Memory of the LRA-DCRXS Once a zone is programmed to a transmitter/sensor, its memory must be erased before a different transmitter/sensor can be programmed to it.
- On the receiver, hold down the
- learn button until you see the red LED (inside the front lens cover) start to blink. This denotes that the unit is in programming mode. Release this button. 3
- Simultaneously hold the
- learn button & the ♫ melody selector button for approximately 4 seconds until you hear a quick chime sound. This notifies that the memory of the LRA-DCRXS-L has been erased. Changing the Melody on the Receiver AFTER
Programming
- Hold the
- learn button for approximately 3 seconds until you notice the red LED (the receiver is now in programming mode). Release the
- learn button.
- Press & release the ♫ melody selector button until you hear the melody you want.
- Push the front door button on the transmitter (see Figure 3) to change the melody for the front door.
- If you want to change the melody for the back door, select the melody and then press the back door button.
- To exit programming mode, press the
- learn button.
Warranty
- Safeguard Supply, an LHE, Inc. company, warrants this product to be free of
- defects in materials and workmanship for a period of one year from the date of
- purchase. This warranty does not cover damage resulting from accident, abuse,
- act of God, or improper operation. If this product does become defective,
- return it to Safeguard Supply. Please include a note describing the troubles
- along with your name and return address as well as the original sales receipt. If
- the product is covered under the warranty, it will be repaired or replaced at no
- charge. If the warranty does not cover it, you will be notified of any charges
- before the work is done.
- Safeguard Supply
- 1680 Roberts Blvd. NW
- Suite 404
- Kennesaw, GA 30144
904-245-1184
--- page break ---
FCC Compliance
- This equipment complies with FCC radiation exposure limits for an
- uncontrolled environment. This equipment should be installed and operated
- with a minimum distance of 5mm between the radiator and your body. This
- transmitter must not be co-located or operating in conjunction with any other
- antenna or transmitter.
- This device complies with Part 15 of the FCC Rules. Operation is subject to
- the following two conditions: (1) this device may not cause harmful
- interference, and (2) this device must accept any interference received,
- including interference that may cause undesired operation.
- Changes or modifications not expressly approved by the party responsible for
- compliance could void the user’s authority to operate the equipment.
- This equipment has been tested and found to comply with the limits for a Class
- B digital device, pursuant to Part 15 of the FCC Rules. These limits are
- designed to provide reasonable protection against harmful interference in a
- residential installation. This equipment generates, uses and can radiate radio
- frequency energy and, if not installed and used in accordance with the
- instructions, may cause harmful interference to radio communications.
- However, there is no guarantee that interference will not occur in a particular
- installation.
- If this equipment does cause harmful interference to radio or television
- reception, which can be determined by turning the equipment off and on, the
- user is encouraged to try to correct the interference by one or more of the
following measures:
- Reorient or relocate the receiving antenna. Increase the separation between the equipment and the receiver.
- Connect the equipment to an outlet on a circuit different from that to which the receiver is connected.
- Consult the dealer or an experienced radio/TV technician for help. 4