
Wired Doorbell Button Replacement: A Step-by-Step Guide
This guide explains how to replace your wired doorbell button, covering safety steps, wiring, and troubleshooting to get your doorbell working again.
On This Page
- Overview of wired doorbell button replacement
- Why you might need to replace a wired doorbell button
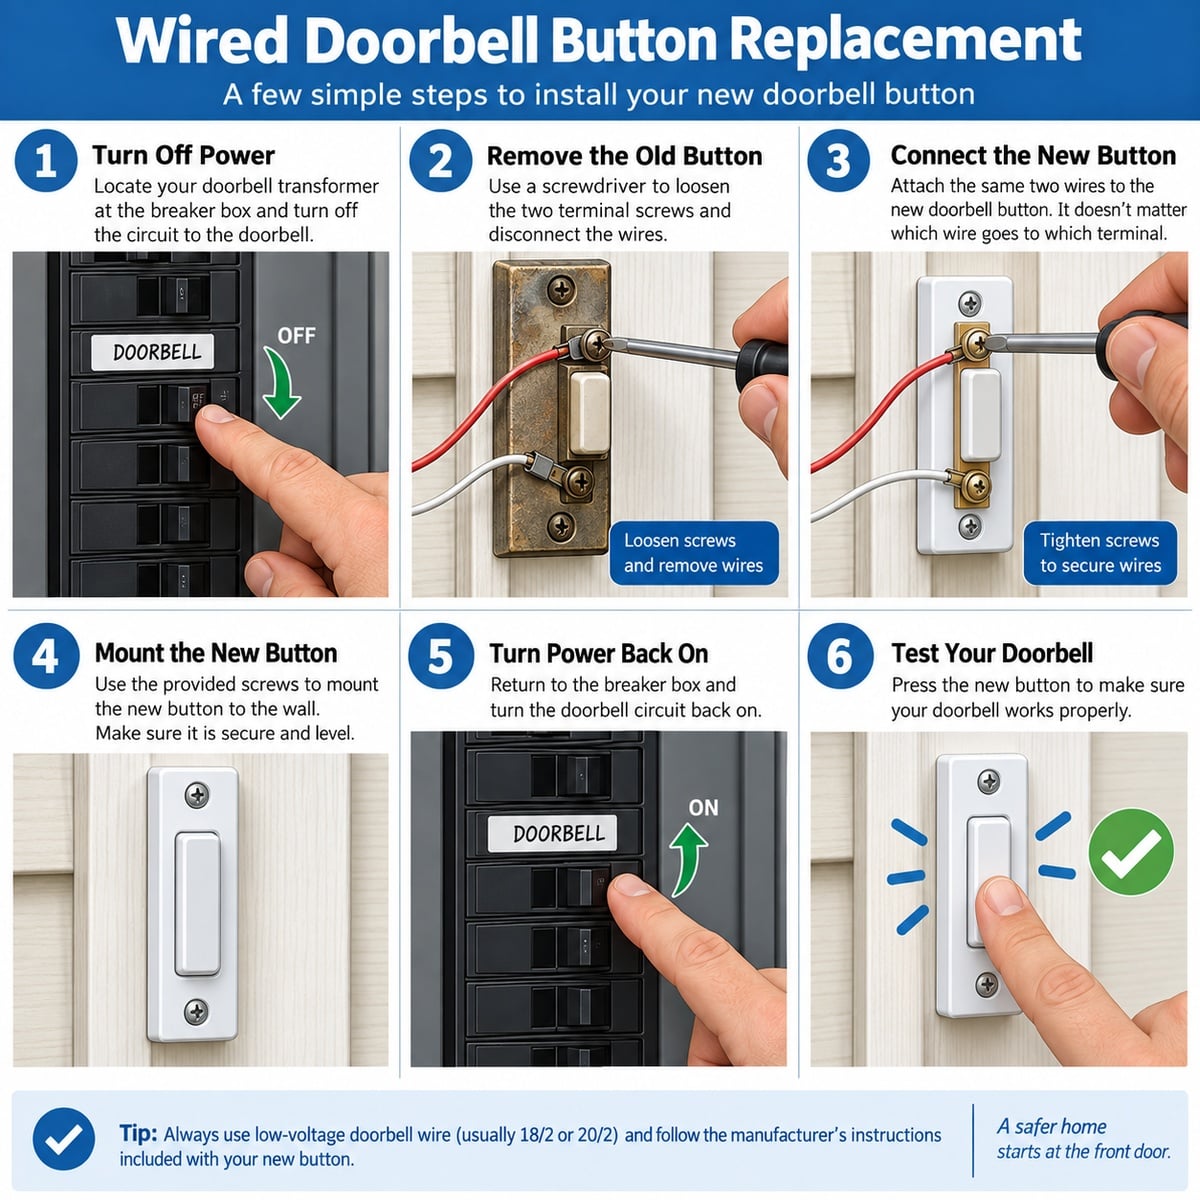
- Safety first: turning off power to your doorbell
- How to remove your old wired doorbell button
- Choosing the right replacement wired doorbell button
- Connecting your new wired doorbell button
- Testing your new doorbell button and chime
- Troubleshooting common issues
Replacing a wired doorbell button involves disconnecting power, removing the old button, wiring the new one, and restoring power. This guide walks you through the steps to successfully swap out an old or broken wired doorbell button for a new one, ensuring your doorbell system functions correctly. A working doorbell is important for visitors and deliveries alike.
Overview of wired doorbell button replacement
Replacing a wired doorbell button is a straightforward DIY task that generally takes less than an hour. The process requires a few basic tools and careful attention to safety, particularly when dealing with electrical wiring. By following these steps, you can restore your doorbell's functionality and improve your home's curb appeal.
Why you might need to replace a wired doorbell button
Over time, doorbell buttons can wear out or become damaged, leading to inconsistent operation or complete failure. Here are common reasons to consider replacement:
- No chime sound: If pressing the button produces no sound, even if your chime unit and transformer are working.
- Intermittent operation: The doorbell only works sometimes, or you have to press it multiple times.
- Stuck button: The button mechanism itself is physically stuck, preventing it from springing back into place.
- Damaged casing: The button's housing might be cracked, faded, or broken due to weather exposure or physical impact.
- Light not working: If your button has a light, and it no longer illuminates, the bulb or the button's internal wiring may be faulty.
- Aesthetic upgrade: You might simply want to update the look of your entryway with a new, more modern, or decorative button.
Often, a non-working doorbell is due to a faulty button rather than an issue with the doorbell transformer or chime unit.
Safety first: turning off power to your doorbell
Before beginning any work on electrical components, always prioritize safety. Your wired doorbell system operates on low voltage, typically 10-24 volts, supplied by a transformer. However, it is still crucial to disconnect power to avoid any risk of short circuits or damage to your system.
Locate your home's main electrical panel, usually in a basement, garage, or utility closet. Find the circuit breaker labeled for your doorbell or the general circuit breaker for your lighting. Flip the breaker to the 'off' position. If your breakers are not labeled, you may need to turn off the main power to your home temporarily or identify the correct breaker by listening for the doorbell chime as you test each one.
How to remove your old wired doorbell button
Once the power is off, you can safely remove the old doorbell button.
- Unscrew the button: Most wired doorbell buttons are secured to the doorframe or wall with small screws, often hidden under the trim or on the sides of the button housing. Carefully remove these screws.
- Pull the button away: Gently pull the button away from the wall. You will see two low-voltage wires connected to the back terminals of the button.
- Disconnect the wires: Note how the wires are connected (though for a simple wired button, polarity usually doesn't matter). Use a small screwdriver or your fingers to loosen the terminal screws and detach the wires. Inspect the wires for any fraying or corrosion.
If the wires appear corroded or damaged, trim back a small section to expose fresh copper or clean the existing wire ends before connecting the new button.
Choosing the right replacement wired doorbell button
Selecting a new button involves considering compatibility, material, and design. Most wired doorbell systems use standard low-voltage buttons, making replacement generally straightforward.
When looking for a replacement, ensure it's a wired doorbell button. While many wired buttons are universal, some might have specific voltage requirements or features like an integrated light. If your existing button is lighted, you might want a replacement with a similar feature. You can find various styles, from simple plastic designs to decorative metal options like a lighted doorbell button, to match your home's aesthetic. You can browse many options on our doorbell buttons category page.
Connecting your new wired doorbell button
With the old button removed and the new one in hand, connecting it is the reverse of removal.
- Strip wires (if needed): If your wires are damaged or you trimmed them, carefully strip about half an inch of insulation from each wire end.
- Connect the wires: Attach one wire to each of the two screw terminals on the back of the new doorbell button. Ensure the wire is securely wrapped around the screw and tightened down. For standard wired doorbell buttons, the order of the wires typically does not matter.
- Push wires back: Gently push any excess wire back into the wall opening.
- Mount the new button: Position the new button flush against the doorframe or wall and secure it with the mounting screws provided.
Testing your new doorbell button and chime
Once the new button is securely mounted and wired, it's time to restore power and test the system.
Return to your electrical panel and flip the circuit breaker back to the 'on' position. Go to your doorbell button and press it firmly. You should hear your doorbell chime sound. If your button has a light, it should also illuminate. Press the button a few times to ensure consistent operation.
Troubleshooting common issues
If your new doorbell button doesn't work after installation, here are some common troubleshooting steps:
- No power: Double-check that the circuit breaker for your doorbell is indeed in the 'on' position.
- Loose connections: Turn off the power again and re-examine the wire connections at the back of the doorbell button. Ensure the wires are firmly seated under the terminal screws.
- Faulty button: Although rare for a new product, the button itself might be defective. If you have a multimeter, you can test for continuity.
- Chime unit or transformer issue: If the button seems correctly installed but still no sound, the issue might lie with your chime unit or the transformer. For more comprehensive help, refer to our troubleshooting tips.
If you continue to experience problems, consider contacting a qualified electrician or our customer support for further assistance.
More in Wired Doorbell FAQ
Browse the full FAQ category or continue with related answers from the same FAQ category.