
Two Doorbell Wiring with Tri-volt Transformer
Get a plain-language answer to two doorbell wiring with tri-volt transformer, with setup notes, compatibility details, and links to related help and.
Updated: September 15, 2026Original publish date: August 7, 2025
On This Page
Short answer: This page explains two doorbell wiring with tri-volt transformer in practical terms, with links to the products, setup guides, and troubleshooting steps that usually matter next.
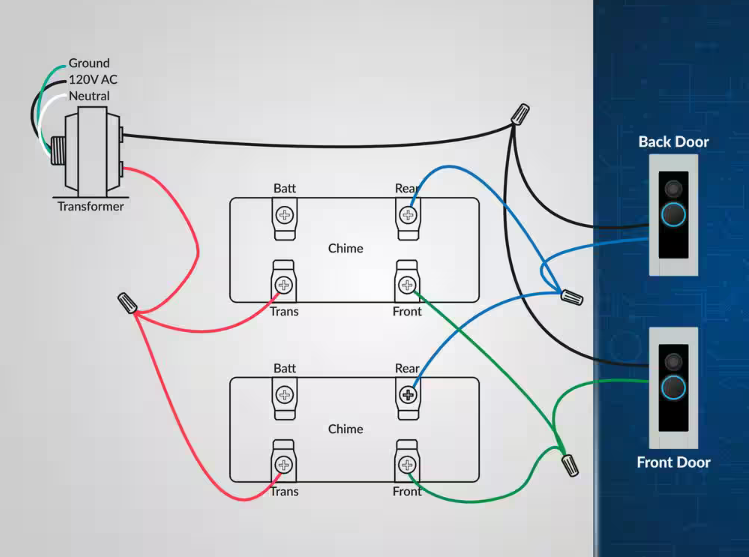
Using 16V Output @ 10VA for Two Doorbells
Step-by-Step Wiring Instructions
⚠️ Safety First: Turn off power at the circuit breaker before beginning any electrical work!
- Install the Transformer:
- Connect 120V household power to primary side (hot, neutral, ground)
- Locate the 16V output terminals on the secondary side
- Run Power Wires (Parallel Connection):
- From the 16V terminal, run a red wire to a junction point
- Split from junction to both doorbells’ TRANS terminals
- From the COM terminal, run a black wire to a junction point
- Split from junction to both doorbells’ COM terminals
- Connect Push Button 1 (Front Door):
- Run wire from Doorbell 1’s FRONT terminal to Button 1
- Run wire from Button 1 back to Doorbell 1’s TRANS terminal
- Connect Push Button 2 (Back Door):
- Run wire from Doorbell 2’s FRONT terminal to Button 2
- Run wire from Button 2 back to Doorbell 2’s TRANS terminal
- Test the System:
- Turn power back on at circuit breaker
- Press each button – each should ring its respective doorbell
💡 Pro Tips:
- Use 18-20 AWG bell wire for all low-voltage connections
- Label wires at both ends for future maintenance
- Two typical doorbells (5VA each) = 10VA total, which is perfect for the 16V 10VA tap
- Wire nuts or terminal blocks work well for creating junction points
How It Works
When a button is pressed, it completes the circuit:
- Power flows from transformer 16V terminal → doorbell TRANS terminal
- Through the doorbell → out the FRONT terminal
- Through the pressed button
- Back to the doorbell TRANS terminal → to transformer COM
- This completed circuit activates the chime
Important: Each doorbell operates independently. Pressing one button only rings its connected doorbell, not both.
More in Wired Doorbell FAQ
Browse the full FAQ category or continue with related answers from the same FAQ category.
Related FAQ categories
Wired doorbell chime replacement optionsExplore your options for replacing a wired doorbell chime, including common issues and installation tips.What is bell wire? Your guide to doorbell wiring.Discover what bell wire is, its specifications, and installation tips for your doorbell system.What does a doorbell transformer look like?Discover what a doorbell transformer looks like and how to identify it in your home.How to Fix a Doorbell: Step-by-Step Troubleshooting GuideTo fix a doorbell, begin by checking its power supply, then systematically inspect the button, chime unit, and wiring for common issues.Wired Doorbell Button Replacement: A Step-by-Step GuideThis guide explains how to replace your wired doorbell button, covering safety steps, wiring, and troubleshooting to get your doorbell working again.