
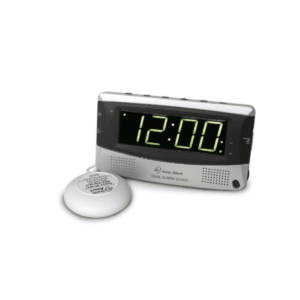
SA-SBD375SS User Manual
Setup, pairing, and troubleshooting for the SBD375SS Sonic Alert Alarm Clock for the Deaf.
- Sonic Boom Dual Alarm Clock with Bed Shaker
- Model SBD375ss-v3
- OPERATION INSTRUCTIONS
- IMPORTANT – Please read these instructions carefully before use and retain for future
- reference. See operating instructions on back.
- – Use only the supplied or recomended Sonic Alert adaptor to connect the
- unit.
- Warning: To prevent fire or shock hazard do not expose this appliance to rain or
- moisture. Before connecting to mains/ power make sure that the
- requirements specified on the apparatus corresponds to the available power
- supply in that country i.e. AC100-240V~, 56/60 Hz.
- – The ventilation should not be impeded by covering the ventilation
- openings with items such as, newspaper, table cloth, curtains, etc;
- – No naked flame sources, such as lighted candles should be placed on the
- apparatus.
- – It shall not be exposed to dripping or splashing and that no objects filled
- with liquids, such as vases, shall be placed on the apparatus.
- – Do not place the product in closed bookcases or racks without proper
- ventilation.
- – Where the mains/ power plug is used as the disconnect device, the
disconnect device shall remain readily operable.
--- page break ---
- OPERATION INSTRUCTIONS
- Features shown on diagram above:
- 1) Alarm Selector
- 2) Vibrator Hi/Lo Switch
- 3) Clock Display
- 4) PM Indicator
- 5) Alarm SET/ OFF Button / Alarm
- Duration Time
- 6) Fast Min./ Hour Button / 12 or 24
- Hour Selector
- 7) Slow Min./ Hour Button
- 8) Snooze Button/ Snooze Duration
- Time/ Dimmer Control
- 9) Time Set Switch
- 10) Tone Control Wheel
- 11) Alarm Mode Switch
- 12) Alarm-1 Indicator (AL1)
- Figure B
- 13) Alarm-2 Indicator (AL2)
14)
Volume Control
Wheel
- 15) Vibrator / Bed Shaker Input
- 16) DC Power Input
- 17) Backup Battery Compartment
- Test Mode:
- 1) Press and hold the Snooze and Time buttons for 3 seconds to enter the Test
- Mode. The display will show "7ES7" to indicate it is in TEST Mode.
- 2) If within 1 minute no button is pressed, then it will exit the Test Mode and return
- back to the Time Mode.
- 3) Press any button within 1 minute (except the Snooze & Time buttons, which has no
- effect), it will exit the Test Mode immediately.
- 4) While in Test Mode, sliding the Function Switch will demonstrate the different
- functions of the clock:
- a) Function Switch at OFF, it will have a continuous "Vee" sound to indicate it is in
the Test Mode. b) Function Switch at BUZZ, it will demonstrate the buzzer sound. c) Function Switch at VIB, it will demonstrate the vibrator.
- d) Function Switch at VIB & BUZZ, it will demonstrate the buzzer sound & the
- vibrator.
- 5) After finish with the Test Mode, press any button (except the Snooze & Time
- buttons, which has no effect) it will exit the Test Mode immediately.
- Setting the Correct Time –
- 1) Press and hold the “TIME“ Button (9) and at the same time press the “FAST“ Button (6)
or the “SLOW“ button (7) to advance clock display unil you have desired time. 2) The lighted dot (4) located in upper left corner of the clock display indicates the time is PM. For AM time, this dot will not light up.
- Setting the Alarm Time–
- Setting Alarm 1
- 1) Slide the “ALARM SELECTOR“ (1) to AL1 position, the alarm indicator “AL1“ (12) will
- light up.
- 2) Press and hold the “ALARM SET /OFF“ (5) button and at the same time press the
- “FAST“ Button (6) or the “SLOW“ button (7) to advance clock display until you reach
desired alarm setting. 3) Make sure alarm time is correctly set for AM or PM (4).
--- page break ---
- Setting Alarm 2
- 4) Once alarm AL1 has been set, slide “ALARM SELECTOR“ (1) to AL2 position. , the
- alarm indicator “AL2“ (13) will light up.
- 5) Slide the “ALARM SELECTOR“ (1) to AL2 position, the alarm indicator “AL2“ (13) will
- light up.
- 6) Press and hold the “ALARM SET /OFF“ (5) button and at the same time press the
- “FAST“ Button (6) or the “SLOW“ button (7) to advance clock display until you reach
- desired alarm setting.
- Selecting 12 or 24 hours format – Clock is set to 12 hour as the default setting
- Press and hold the Fast Button (9) for 6 seconds to enter the hour selection mode,
- release the Fast Button (9) when the display shows "12 H" or "24 H". Press and release
the hour button to toggle between 12 or 24 hours. If no selection is made within 4 seconds, then the last displayed hour format will be chosen and the display will return to the normal Time mode.
- Alarm –
- Enable Alarms:
- 1) To enable Alarm 1, slide the “ALARM SELECTOR“ (1) to AL1 position. the alarm
- indicator “AL1“ (12) will light up.
- 2) To enable Alarm 2, slide the “ALARM SELECTOR“ (1) to AL2 position, the alarm
- indicator “AL2“ (13) will light up.
- 3) To enable both alarms, slide the “ALARM SELECTOR“ (1) to AL2 position, the alarm
- indicators “AL1“ (12) and “AL2“ (13) will light up.
- To Select Wake up mode
- To select the wake up mode, slide the “Alarm Mode Switch“ (11) to your desired position:-
- a) “BUZZ“ for sound b) “VIB“ for bed shaker c) “VIB/ BUZZ“ for both sound and bed
shaker NOTE: once the wake up mode is chosen, this will apply to both alarms. Alarm Patterns – When the alarm is activated, alarm pattern of the buzzer / flashing display will be out of sync with the vibrator. This means that when the buzzer / flashing display is ON, the vibrator will be OFF and while the buzzer/ flashing display is OFF, the vibrator will be ON.
ALARM 1 - When Alarm 1 is activate, it will have 3 beeps for buzzer, then the vibrator. This pattern is repeated until the alarm is stopped. ALARM 2 - When Alarm 2 is activate, it will have 4 beeps for buzzer, then the vibrator.
This pattern is repeated until the alarm is stopped. Adjusting The Alarm Duration Time The default alarm duration time setting is 30 minutes; you may adjust the alarm duration between 1 minute and 59 minutes as desired. To adjust the alarm duration:
- Press and hold the AL. SET button (5) for six seconds. The clock display will show the default alarm duration as ‘30’. Release the AL set button
- Press the “ MIN” button (10) to adjust the alarm duration to the desired setting, from 1 minute to 59 minutes.
- When the display is showing the desired alarm duration time, it will return to the normal clock mode after 3 seconds. The new alarm duration time setting becomes the new default and remains in the memory until you change it again. Snooze Operation – 1. When the alarm turns on in the morning you may press the SNOOZE Button (8) to stop the alarm temporarily. The alarm will shut off for 9 minutes or for the predetermined time you select from 1-30 minutes, and then turn on again. The snooze operation may be repeated indefinitely until the alarm is turned off. 2. The SNOOZE function of Alarm 1 and Alarm 2 is independent of each other. --- page break --- Adjusting The Snooze Time The default snooze time setting is 9 minutes but you may adjust the snooze time between 1 minute and 30 minutes as desired. To adjust the snooze time:
- Press and hold the SNOOZE Button (8) for four seconds. The clock display will show the default snooze time ‘9’. Release the snooze button
- Press the “SLOW“ Button (7) to adjust the snooze time to the desired setting, from 1 minute to 30 minutes.
- When the display is showing the desired snooze time, it will return to the normal clock mode after 3 seconds. The new snooze time setting becomes the new default and remains in the memory until you change it again. Shutting Off the Alarm – Alarm can be shut off temporary for the day or permanently shut off. 1) When alarm goes off, press the “ALARM SET/OFF“ (5) button to turn off for the day and come back on at the same time the next day, if alarm settings have not changed. 2) To shut the alarm off permanently, slide the “ Alarm Mode Switch“ (11) down to the OFF position. The alarm will not come on until the “ Alarm Mode Switch“ (11) is set to “VIB/BUZZ“, “VIB“, or “BUZZ“ position. NOTE: The Alarm Off function of Alarm 1 and Alarm 2 is independent of each other. Dimmer Operation There is a 5-level brightness control for the LED display. Press the SNOOZE button once to change the display brightness. The brightness will cycle from 5-4-3-2-1-2-3-4-5 (from bright to dim then from dim to bright). *NOTE*: The dimmer function will not work, when the clock is in snooze mode.
Volume Control
- 1) To adjust the volume, rotate VOLUME wheel (12) located on the lower right corner of the
- clock.
- Tone Control –
1) To adjust the TONE, turn the TONE wheel (10) located on the top right corner of the clock. Bed Shaker / Vibrator – 1) Attach the bed shaker jack to the back of clock at “VIBRATOR INPUT“ (15). 2) To turn on vibrator slide “Alarm Mode Switch“ (11) to “VIB/BUZZ“ or “VIB“ position. 3) Place vibrator between mattress and box spring.
- Bed Shaker / Vibrator Strength Control
- Slide the Vibrator Strength switch (2 ) to adjust the vibrator strength, Hi setting is the
- stronger and the Lo setting is the weaker.
- Battery Backup –
To use the battery backup, you can install a 9-volt alkaline battery in the back of the clock located under the Battery Compartment Cover (17). The battery needs to be purchased separately. Note the LED display will not show during power failure but the clock will still be running and keeping proper time until the power comes back.
During a power failure, the alkaline battery can only keep the clock IC running for up to 30 days. (During a Power failure, the LED display will not show the time.) NOTE: For the best results it is recommended that the battery be changed every 6 months. If the clock is not used for a while, it is recommended to remove the battery to avoid damage to the clock from battery leakage.
--- page break ---
- DC 9V Power Input –
- Attach the “DC POWER INPUT“ (16) to the back of DC9V IN next to “VIBRATOR
- INPUT“ (15); it is the smaller input of the two.
- NOTE: IMPORTANT: do not confuse “DC POWER INPUT“ (16) with the “VIBRATOR
- INPUT“ (15)
- GENERAL DATA
- UL listed Power Adaptor: AC100-240V~, 50/60Hz
- Power Consumption: Adaptor Output: DC9V , 650mA
- CAUTION:
- TO REDUCE THE RISK
- OF ELECTRICAL
- SHOCK, DO NOT
- REMOVE THE COVER
- The Lightening flash and The exclamation mark
- (OR BACK) FROM THE
- arrowhead within the within the triangle is a
- PRODUCT. NO USER
- triangle is a warning sign warning sign alerting you
- SERVICEABLE PARTS
- alerting you of dangerous of important instructions
- INSIDE. REFER
- voltage inside the product. accompanying the
- SERVICING TO YOUR
product. SONIC ALERT DEALER.
- WARNING: TO PREVENT FIRE OR SHOCK HAZARD, DO NOT EXPOSE THIS
- APPLIANCE TO RAIN OR MOISTURE.
- The normal function of the product may be disturbed by Strong Electro Magnetic
- Interference. If so, simply reset the product to resume normal operation by
- following the instruction manual. In case the function could not resume, please
use the product in other location. – Attention should be drawn to the environmental aspects of battery disposal. – this indicating separate collection for electrical and electroinc equipment.
--- page break ---
SONIC ALERT’S 1 YEAR
Warranty
- The Sonic Boom Alarm Clock Model SBD375ss is
- warranted against manufacturing defects in materials and
- workmanship for one (1) year from the date of purchase.
- Within this period Sonic Alert will repair or replace at our
- option the SBD375ss without charge for parts and labor.
- Simply contact our customer service department to obtain an RA
- (return authorization number) and instructions on how to process your
- product for return. Call 1-888-864-2446 or e-mail to
- RMA@sonicalert.info. You’ll need a copy of your receipt to process
the return authorization. Sonic Alert Inc., Troy MI 48083, USA.
- Sonic Alert
- Made in China
- Sonic Alert , Troy, MI 48083
- www.SonicAlert.com 1-888-864-2446