
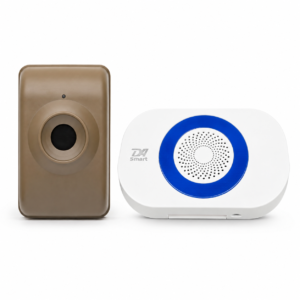
SMA-4000 User Manual
Setup, pairing, and troubleshooting for the Dakota Alert SMA-4000 Driveway Alarm Kit with Smart Receiver.
DA™ Dakota Alert® WIRELESS SECURITY EQUIPMENT
Wireless Smart Receiver SR-4000 USER GUIDE
www.dakotaalert.com
STOP Do not plug the receiver into power until you are at Step 8
Step 1: Download the Dakota Alert App
- Search for **Dakota Alert** in your app store or scan the QR code above.
- Make sure your phone is connected to your local Wi-Fi network. Note: If the SR-4000 loses Wi-Fi connection, a single blue LED light will blink slowly. If this occurs, check the local router for any internet interruption.
3
Step 2: Follow the sign up directions for new users or login (for existing users). Step 3: Once the app is downloaded, make sure the phone's Wi-Fi, Bluetooth and Location are all turned on and allow access for the initial set up. 4
Step 4: Open the Dakota Alert App Step 5: To add the SR-4000, tap the "+" in the upper right corner. Tap here to add Receiver 5
Step 6: At the “Add Device” screen, scroll to the bottom of the list on the left side and select “Others”. Step 6 First Select “Others” Step 7: Select “Others (2.4GHz & 5GHz)” from the list on the right. Step 7 “Others” (2.4 GHz & 5 GHz) 6
Step 8: With the receiver unplugged, press and hold the “MODE” button for 3 seconds while you plug in the power cord at the same time. Press & hold MODE Button for 3 seconds While pressing MODE button, plug in your receiver Step 9: After plugging in the power cord, release the “MODE” button after 3 seconds. A single blue light should be blinking rapidly on the receiver. NOTE: After you release the MODE button it may take up to 10 seconds for the blue light to start blinking rapidly. If blue light is not blinking rapidly, repeat steps 8 and 9. 7
The image at the top of the page is for reference only. Please continue with the steps listed below. Step 10: If the blue LED light is blinking rapidly on the receiver, press “Confirm”. Step 11: Then press “Next” Reset the device Press and hold the RESET button for 5s until the indicator blinks (Subject to the user manual). Confirm the indicator is blinking Next Reset Device Step by Step 8
- In the app, press “Confirm” and enter your Wi-Fi password.
- When this step is successful, the blue LED will stop blinking and the entire circle will light up with the blue LED lights
- In the “Setting” make sure “Push Notification” is turned on. Now you can edit the SR-4000 and rename it how you choose
9
Programming 4000 Series sensors to the SR-4000 Receiver
Note: If you are using the SR-4000 relay and 12 VDC output feature skip to the “Advanced Set Up” section on page 12
Basic Receiver Setup
- Place your receiver and transmitter(s) next to each other. *Be careful not to activate your transmitter until you select the tune you want.*
- Press and hold the **MODE** button for three seconds until all the LEDs flash and start blinking slowly.
- Press the 🔊 (volume) button repeatedly until you find the tune you want to sound when the transmitter is activated.
| 1 | Ding Dong (high) | 5 | Alarm/Siren | 9 | William Tell | 13 | Beep (high) | |---|---|---|---|---|---|---|---| | 2 | Ding Dong (low) | 6 | Coo Coo Clock | 10 | Canon in D | 14 | Beep (low) | | 3 | Westminster | 7 | Bird Chirping | 11 | Morning | 15 | Beep, Beep | | 4 | Fur Elise | 8 | Twinkle Twinkle | 12 | Toreador March | 16 | Beep, Beep, Beep, Beep |
- After you choose a tune, activate the transmitter (for example, press its button or wave your hand over its motion sensor). The receiver emits a short beep to confirm the transmitter has been programmed. Tip: If you pick the wrong tune, press the volume button again to choose a new sound, then reactivate the transmitter.
- If you are programming more than one transmitter, repeat steps 3–4. You can program up to 16 sensors to your receiver.
- After your transmitter(s) are programmed, press and hold the MODE button until the LEDs stop flashing.
- To test the transmitter tune, activate the transmitter. You'll hear the selected tune through your receiver and the LEDs will flash. You are now ready to assign names to the programmed sensors in the Dakota Alert App Go to page 17 11
Advanced Receiver Setup
NOTE: DIP switch settings only apply while in programming mode.
- Place the receiver and transmitter next to each other. Do not activate the transmitter until the sound and DIP switches are set.
- Press and hold the MODE button for 3 seconds until all LEDs flash and begin blinking.
- Set the DIP switches to control how the receiver responds to a signal. See diagrams below:
ON OFF
- DIP 1: LEDs flash - ON or OFF
- DIP 2: Chime/tune - ON or OFF
- DIP 3: Relay 1 Output - ON or OFF
- DIP 4: Relay 2 Output - ON or OFF
- DIP 5: 12 VDC Output - ON or OFF
- DIP 6 & 7: Control the time duration for Relay 1, Relay 2 & 12 VDC terminals
- DIP 6 “OFF” and DIP 7 “OFF”: 1 second
- DIP 6 “ON” and DIP 7 “OFF”: 5 seconds
- DIP 6 “OFF” and DIP 7 “ON”: 15 seconds
- DIP 6 “ON” and DIP 7 “ON”: 5 minutes
12
- Press and release the 🔊volume button repeatedly until you find the tune you want to use for the transmitter.
- After setting the DIP switches and selecting the tune, activate the transmitter (e.g., press its button or wave at the motion sensor).
- The receiver will beep to confirm it has been coded. Tip: If you pick the wrong tune, press the volume button again to choose a new sound, then reactivate the transmitter.
- To program more transmitters, repeat steps 3–5. You can program up to 16 sensors to your receiver.
- When finished, press and hold the MODE button until the LED lights stop flashing.
Your receiver is now programmed. Changing the DIP switches while not in programming mode will not change relay or 12 VDC settings. 13
Connecting Wires To The Terminals
The SR-4000 receiver has two relay outputs (NO, COM, NC) and a 12 VDC (+ and -) output.
- To connect lead wires to the terminals, strip off 3/8" (10mm) of insulation from the end of the wire.
- With a small screwdriver, press the orange button to open the terminal.
- Insert the bare end of the wire into the terminal opening, then release the orange button. The terminal clamps down on the wire.
- Pull gently on the wire to make sure the connection is secure. 14
Adjusting The Volume
Press the 🔊 volume button repeatedly to adjust the volume(4 levels and off). The LEDs show the volume level for four seconds.
Low Battery Indicator
If the SR-4000 plays your transmitter's tune twice and the LED blinks slowly for ten minutes after the transmitter is activated, your sensor's battery is low. Replace the battery.
Canceling Output Signals
After the SR-4000 receives a signal, the relay and voltage outputs activate, the chime sounds and the LED flashes for 15 seconds. If you want to stop these actions after they have started, briefly press the MODE button. The receiver resets and is ready to be activated again.
15
Deleting All Sensors From The Receiver
Press the MODE button for three seconds. Once lights start flashing, press and hold the volume 🔊 and MODE button together until the four lights flash quickly and turn off.
Mounting The Receiver
The SR-4000 has an internal antenna. To get the best radio range we recommend mounting the receiver on a wall. To mount the receiver attach 2 screws or nails 2.6 inches (6.7 cm) apart, then hang your receiver using holes on the back.
16
Naming Dakota Alert 4000 Sensors in the App
Step 1:
- In the app, go to the “Accessories” section (bottom menu).
- You will see a list of sensors (alarms) in the order they were programmed. Step 2: Tap on each alarm to rename it. Once you change the name select “Save”>”Confirm”>”Save”
Select “Accessories”
Select the alarm you want to rename
- Select “Sub device
- name >” next to the
- alarm, then type a new
- name & “Save”
After you confirm the name select “Save” again, repeat for each sensor
Specifications
- Power Supply: 12 VDC, 500 mA
- Wireless Range: Up to 1 mile (1.6 km)*
- Dimensions: 5X3.3X1.3 in. (12.7X8.3X3.2 cm)
- Operating Frequencies: 433 MHz *Actual range will vary depending on terrain and obstructions
Tech Support
If you have problems using this product after reading this manual, please contact us. You can reach us by phone at 605-356-2772 from 8:30 a.m.-5:00 p.m. Monday through Friday (Central Standard Time). We will be happy to answer your questions and help you in any way we can.
Warranty
Dakota Alert warrants this product to be free of defects in materials and workmanship for a period of one year from the date of purchase. This warranty does not cover damage resulting from accident, abuse, act of God, or improper operation. If this product does become defective, simply return it to Dakota Alert. Please include a note describing the troubles along with your name and return address as well as the original sales receipt. If the product is covered under the warranty it will be repaired or replaced at no charge. If it is not covered by the warranty, you will be notified of any charges before the work is done. 19
Legal Notices
This device complies with Part 15 of the FCC Rules. Operation is subject to the following two conditions: (1) this device may not cause harmful interference, and (2) this device must accept any interference received, including interference that may cause undesired operation. Changes or modifications not expressly approved by the party responsible for compliance could void the user's authority to operate the equipment. This equipment has been tested and found to comply with the limits for a Class B digital device, pursuant to Part 15 of the FCC Rules. These limits are designed to provide reasonable protection against harmful interference in a residential installation. This equipment generates, uses, and can radiate radio frequency energy and, if not installed and used in accordance with the instructions, may cause harmful interference to radio communications. However, there is no guarantee that interference will not occur in a particular installation. If this equipment does cause harmful interference to radio or television reception, which can be determined by turning the equipment off and on, the user is encouraged to try to correct the interference by one or more of the following measures:
- Reorient or relocate the receiving antenna.
- Increase the separation between the equipment and receiver.
- Connect the equipment into an outlet on a circuit different from that to which the receiver is connected.
- Consult the dealer or an experienced radio/TV technician for help. ⚠️ WARNING: Cancer and Reproductive Harm. Go to www.P65Warnings.ca.gov for more information. Dakota Alert, Inc. www.dakotaalert.com Phone: (605) 356-2772 Fax: (605) 356-3662 Address: 32556 477th Ave. | PO Box 130 | Elk Point, SD 57025